
Overview
Throughout this article, we're going to see how a huge graphics card manufacturer took advantage of Auth0 to consolidate user identities from multiple applications. Before relying on Auth0, each application hosted by the manufacturer had its own identity management. That is, if John Doe had access to more than one app, he would have to manage (and remember) two or more credentials. Of course, he could have the same combination of email and password for all applications. But if, for whatever reason, he had to change the password for one of them, his other accounts wouldn't be affected. In addition, any personal data, such as address, would need to be manually updated on each application.
This kind of scenario, although common, is not good for the end user or the owner of the applications. If the manufacturer wanted to implement a new security feature, they would have to refactor multiple applications. Even more, if they wanted to communicate with their users, they wouldn't have a single source of truth showing how many distinct users they had or its personal details (as it could be out of date on one app, and up to date on another).
Fortunately for the manufacturer, and for companies facing similar scenarios, Auth0 facilitates the consolidation of identities in situations like that.
“Consolidating multiple identity sources is easy with Auth0.”
Tweet This
Creating Multiple Identities Sources
To simulate the manufacturer's scenario, we will use two Node.js applications that are dependent on different databases. There are some users with the same credentials (email and password) on each application and some users that exist only on one application or the other. When a user exists on both applications, some details of their personal data will differ on one account and the other. These differences were created to show how merging profiles from different applications is easy with Auth0.
To follow along with this article and see the profile consolidation in practice, we will just need to sign up for a free Auth0 account and configure a few settings on it. This Auth0 account will then communicate with both apps, hosted here and here, to perform the following steps:
- Check, during sign in, if a credential is valid or not.
- Check, during a password retrieval or a sign up, if an email address exists on one of the applications.
The credential verification and the email verification processes occur through requests made by Auth0 to both applications. These requests are issued by two Auth0 Database Action Scripts that we will configure in our account. In both cases, if the user does exist and contains profiles on both application, these profiles are merged and saved on Auth0. If the user exists on only one of the applications, this single profile is used.
Security Notes
As both applications have to expose endpoints that Auth0 will consume, we need to secure these endpoints to avoid attacks from unknown sources. At Auth0 we favor standards, therefore we are going to secure our apps with the OAuth 2.0 grant. We will use the Client Credentials grant, that machine-to-machine interfaces utilize to communicate.
With Client Credentials Grant (defined in RFC6749, section 4.4) a Non Interactive Client (a CLI, a daemon, or a service running on your backend) can directly ask Auth0 for an access_token by using its Client Credentials (Client Id and Client Secret) to authenticate. In this case the token represents the Non Interactive Client itself, instead of an end user.
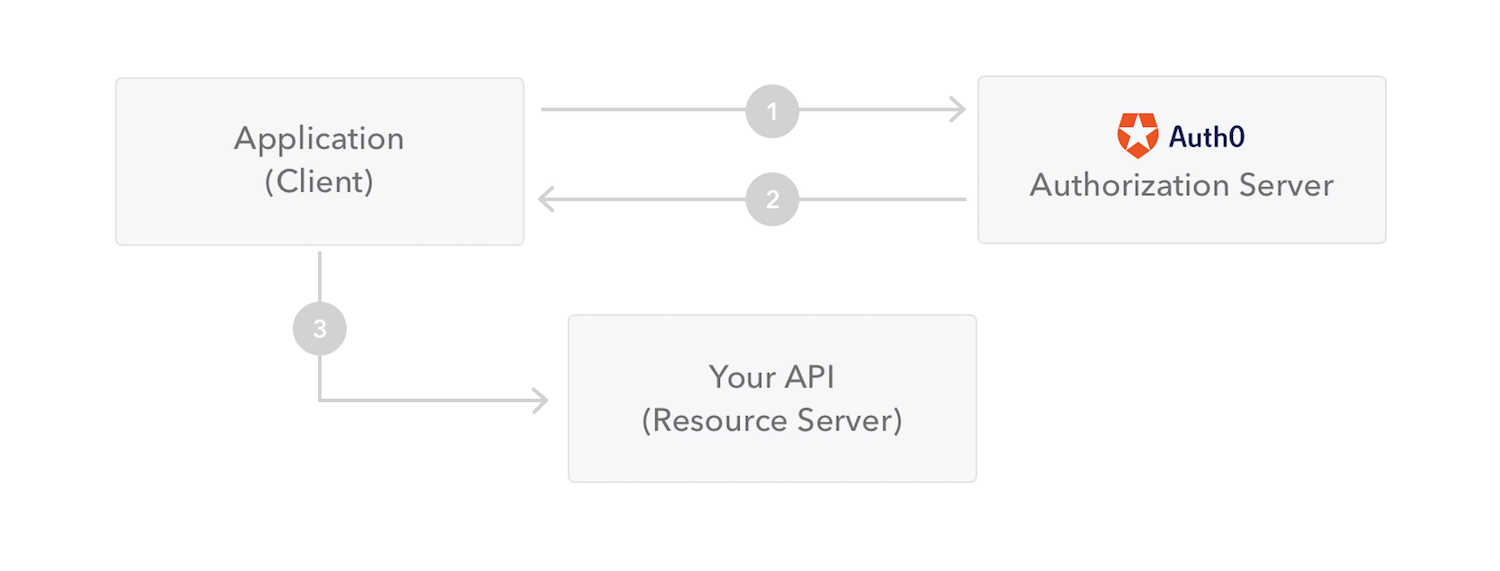
In our scenario, the Auth0 Database Action Scripts that we are going to create will retrieve an access_token from Auth0, and then use this token to identify itself on both applications. These applications were previously secured with Express middleware that validates JSON Web Tokens (JWTs) generated by Auth0 with the following characteristics:
- audience: 'http://sample-app/'
- issuer: 'https://bkrebs.auth0.com/'
- algorithms: ['RS256']
Since the applications are expecting JWTs with the https://bkrebs.auth0.com/ issuer, we will use a client_id and a client_secret previously configured on my own Auth0 account (bkrebs). For the sake of thoroughness, we will recreate these properties to understand the process, but we won't use them.
Consolidating Multiple Identities with Auth0
After creating our account on Auth0, or reusing an existing one, the first step is to create a Database Connection. Let's start by visiting the Database Connections page in the management dashboard, where we will click on the Create DB Connection button. In the form that is shown to us, we will simply define a name for the connection, profile-consolidation, and hit the Create button.
After that we will be redirected to the settings page of the new connection. Auth0 allows us to securely store and manage credentials (email and password) either in an Auth0 Database or in our own custom database. As we already have two databases, we will go to the Custom Database tab and activate the "Use my own database" switch.
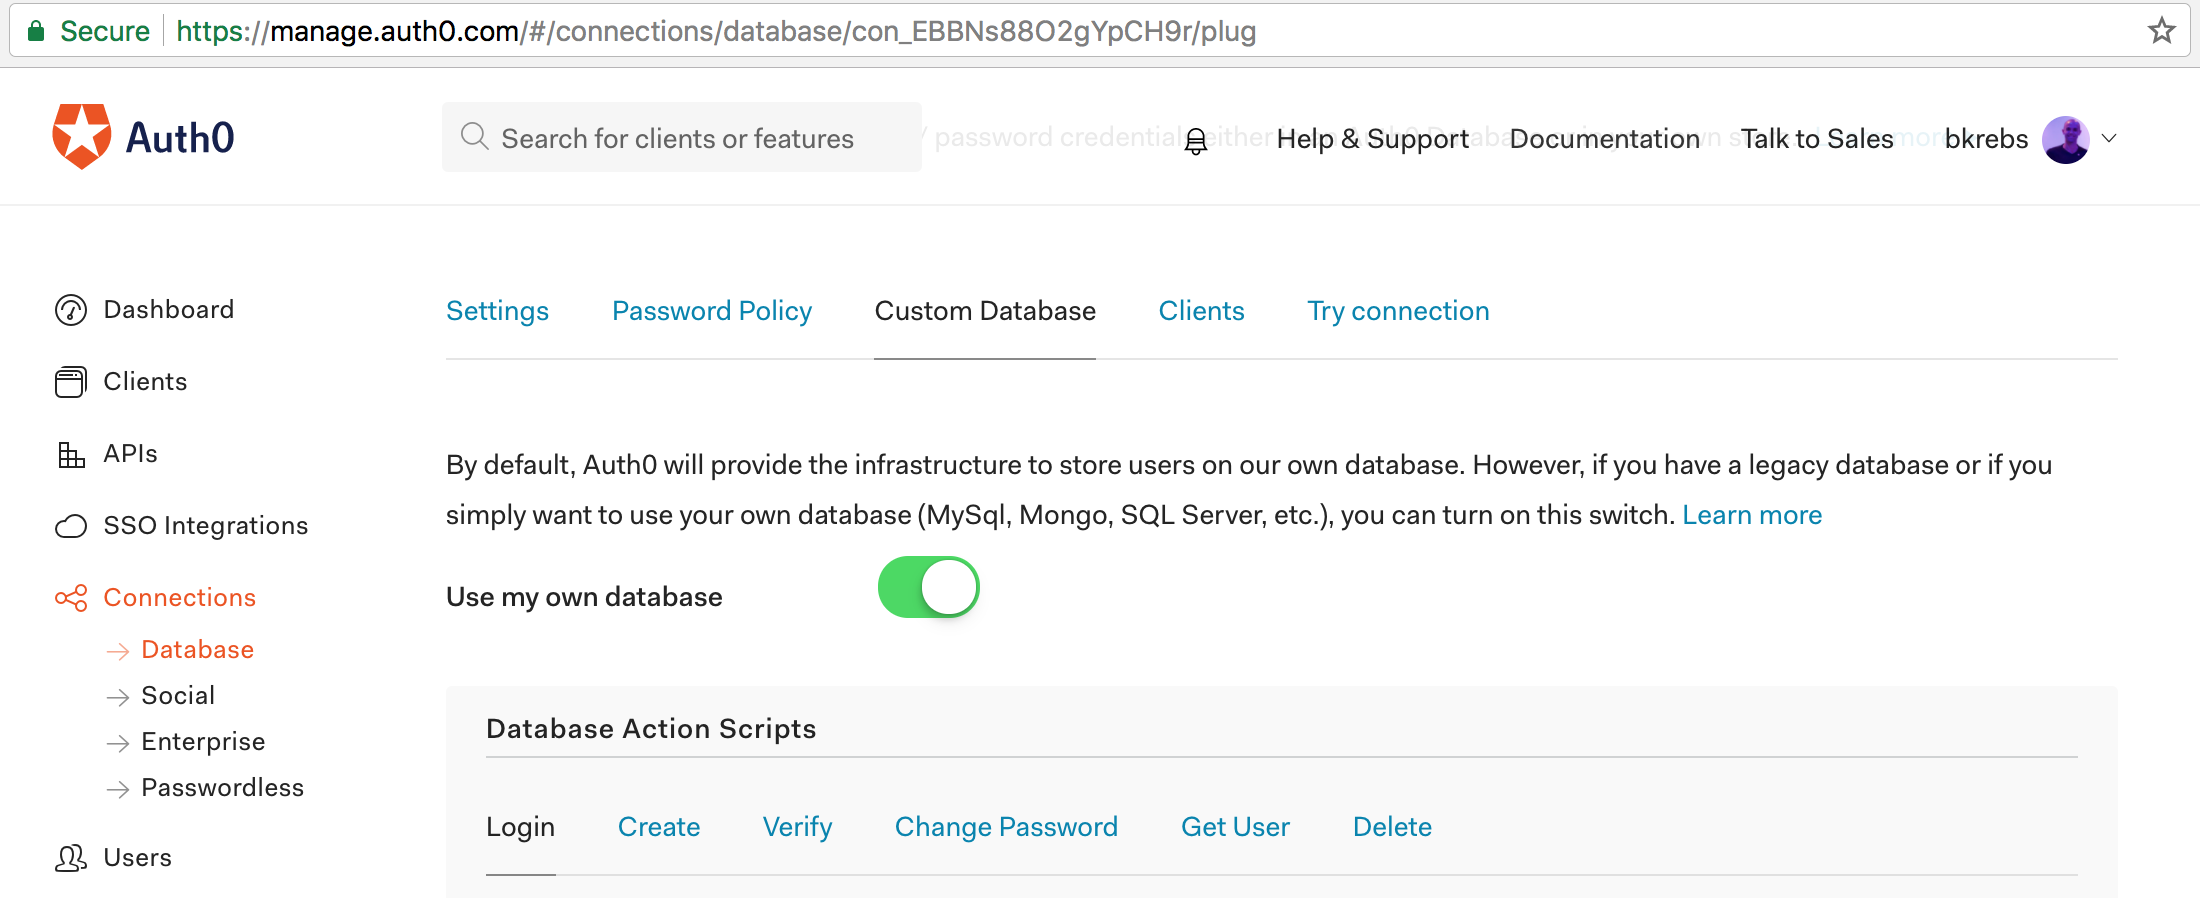
Turning on this option will make this connection dependent on our custom databases forever, as it will always interact with them when users try to sign in, sign up, change password, and so on. This is not exactly what we want. Our goal is to leverage Auth0 to merge users from multiple applications in a reliable and secure database. Therefore, we will go back to the Settings tab and switch on the "Import Users to Auth0" option. This option, as explained in the Settings page, is used when we want to gradually migrate users to the Auth0 user store.
Now, if we go back to the Custom Database tab, we will see that it no longer has five Database Action Scripts (as shown in the screenshot above). We only get two scripts after turning on the option to migrate users.
The first script, called Login, is used to authenticate a user against the credentials stored in our databases. The Login script is executed both when a user attempts to log in or immediately after signing up (as a verification that the user was successfully signed up).
The second script, called Get User, is used to retrieve a user profile from your existing database, without authenticating the user. This script is used to check if a user exists before executing flows that do not require authentication (like sign up and password reset).
Soon, we will address the implementation of both scripts, but first let's create the API representation of our applications and a Client to properly secure them against unknown requests.
Creating an Auth0 API
As explained in Auth0's documentation, an API is an entity that represents an external resource, capable of accepting and responding to protected resource requests made by clients. This definition fits perfectly for both applications that contain the users that we want to merge and import into our Auth0 account. Therefore, we need an API to represent these applications to properly secure them against unauthenticated requests.
To create an API, let's head to the API page on Auth0's management dashboard and click on the "Create API" button. This will bring up a form with three fields: Name, Identifier, and Signing Algorithm.
The name is just a friendly identifier that helps us remember what this API represents. As this API will represent the legacy Identity Providers that we have, let's give it some name like "Legacy IdP". We won't need this name elsewhere, but it's good to give an easy to remember name in order to keep things tidy.
The identifier is an important setting that is used both when requesting an access_token and when validating these tokens. This property is also known as audience and, whenever a request is made to a protected endpoint, must be checked against the audience configured in the application.
In the index.js file that contains the code running on both applications, we can see that the Node.js/Express application is set to accept only tokens targeting the legacy-idp audience. Therefore, let's set the identifier property of our new API to legacy-idp.
// ...
const jwtCheck = jwt({
    secret: jwks.expressJwtSecret({
        cache: true,
        rateLimit: true,
        jwksRequestsPerMinute: 5,
        jwksUri: "https://bkrebs.auth0.com/.well-known/jwks.json"
    }),
    audience: 'legacy-idp',
    issuer: "https://bkrebs.auth0.com/",
    algorithms: ['RS256']
});
// ...
The last property that we need to set is the "Signing Algorithm". There are two options to fill this property: RS256 and HS256. The best and most secure algorithm to be used is RS256, as it is an asymmetric algorithm that uses public/private key. Therefore, let's use RS256 as the Signing Algorithm.
After filling the form with the values above, we can click on the "Create" button to persist our new API.
Defining OAuth 2.0 Scopes on Auth0 APIs
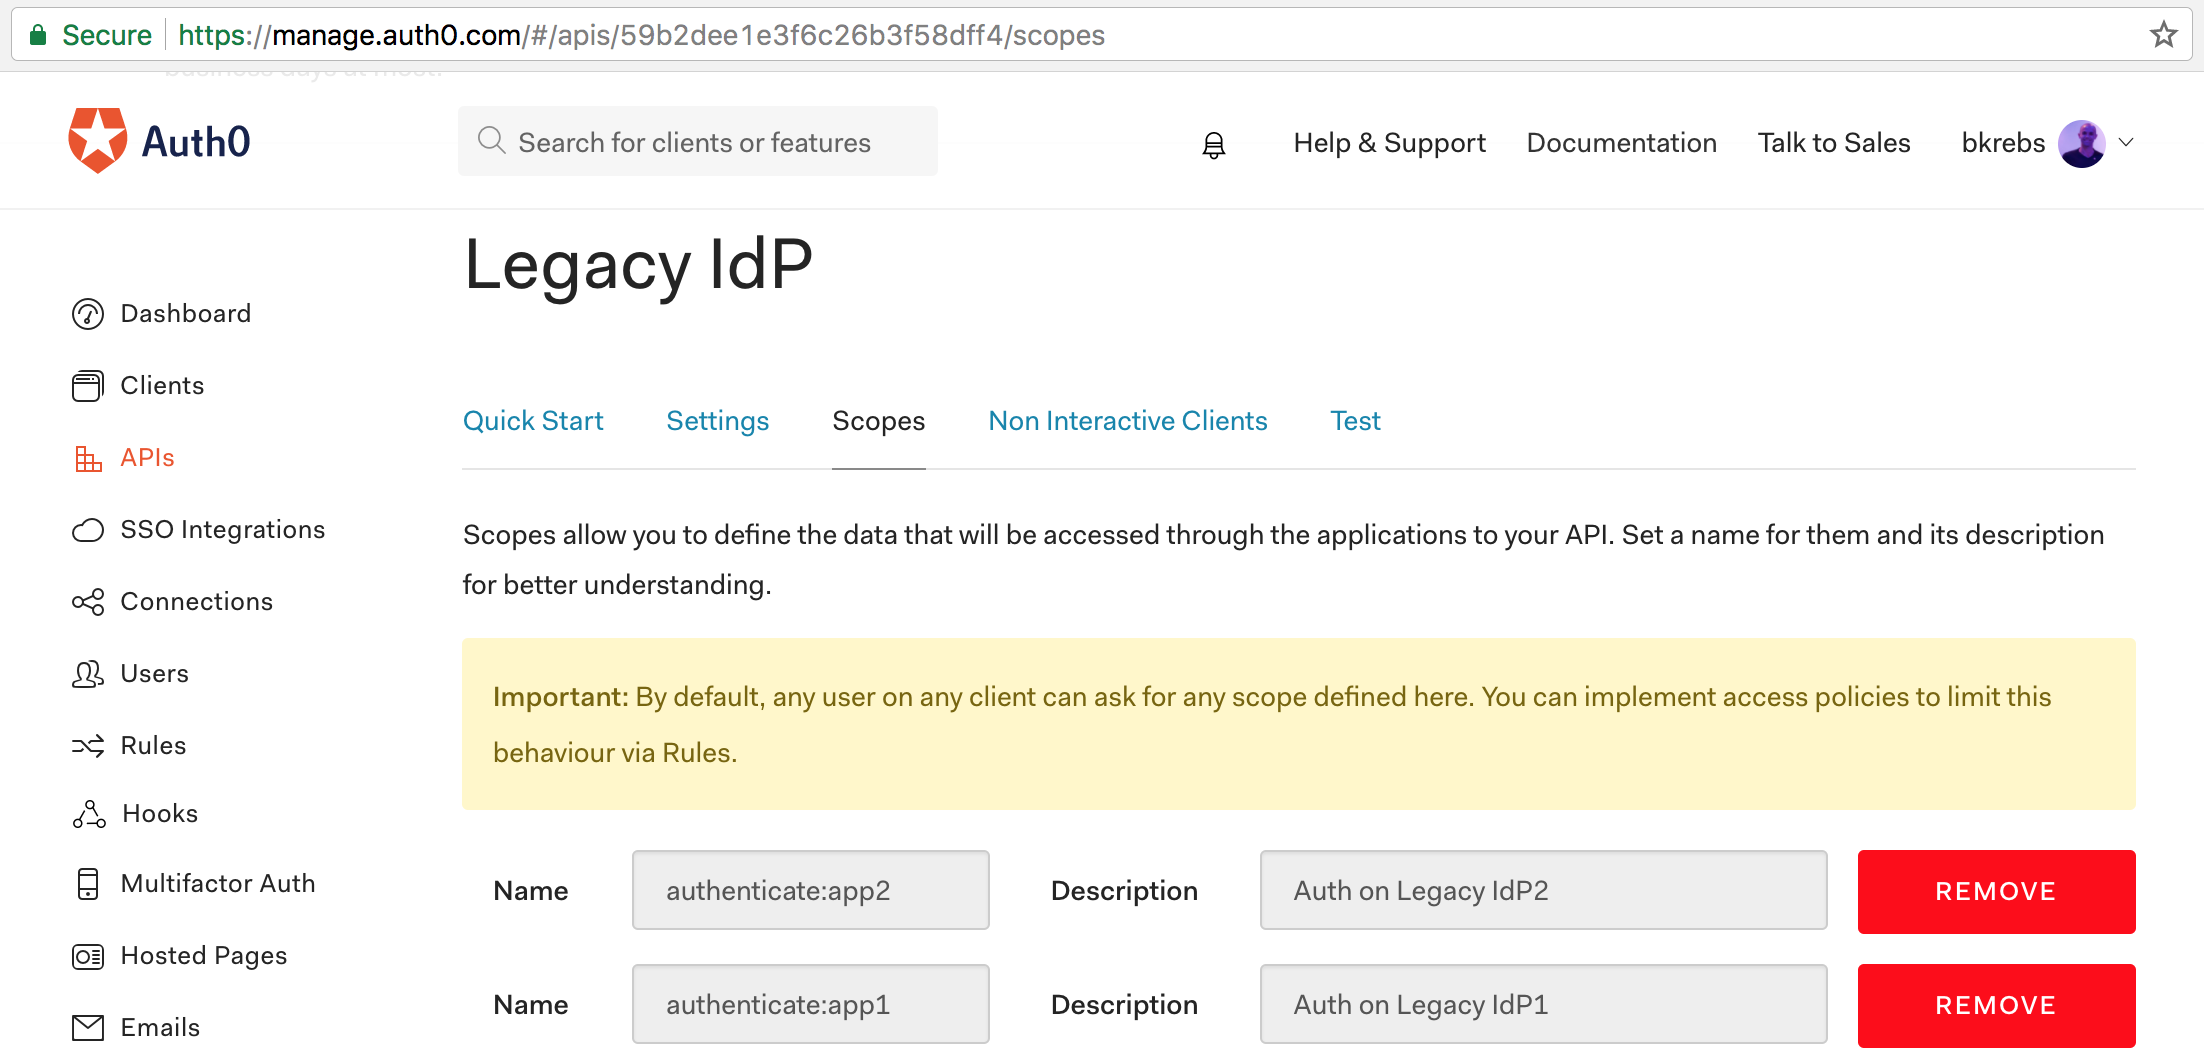
OAuth 2.0 recommends that clients should specify what scopes they want to have when interested in communicating with an API. Scopes, on OAuth 2.0, represent permissions that clients have when dealing with resources that they don't own. For example, in our scenario we are creating an API that stands for two legacy identity providers. As we don't want the client that we are going to create to have unlimited access to these applications, we can restrict its access by setting what scopes the client will get in its token. To do that, let's head to the "Scopes" tab of our brand new API and add two scopes:
- Scope name:
authenticate:app1; Scope description: "Auth on Legacy IdP1" - Scope name:
authenticate:app2; Scope description: "Auth on Legacy IdP2"
Defining scopes like that wouldn't suffice. We would also have to restrict access in the backend. Fortunately, this has been taken care of already, as we can see in the index.js file of our legacy IdPs:
// ...
app.use((req, res, next) => {
    let requiredScope = null;
    if (process.env.app === 'node-1') {
        requiredScope = "authenticate:app1";
    } else {
        requiredScope = "authenticate:app2";
    }
    if (!req.user || !req.user.scope || !req.user.scope.indexOf(requiredScope) < 0) {
        res.sendStatus(401);
        return;
    }
    next();
});
// ...
Creating an Auth0 Client
Besides the API to represent the legacy identity provider, we will also need to create a Client to represent the Auth0 Database Action Scripts that will communicate with our applications. Let's head to the Client page on the Auth0 management dashboard and click on the "Create Client" button.
Clicking on it will bring up a form that asks for two types of information. The first one is the name of the client that we are creating. This name won't be that important as it exists only to help us remember what the client is used for. So let's give a name like "Legacy IdP Action Script".
The second piece of information that the form asks for is the client type. There are four types available:
- Native: We use this type when we want to create a client to represent a mobile or desktop app that natively runs on a device.
- Single Page Web App: We use this type when we want to create a client to represent a SPA written with some JavaScript library (e.g. React, Angular, or Ember).
- Regular Web App: We use this type when we want to create a client that represents old-school web apps (those that refresh the whole page when the user clicks on a link or button).
- Non Interactive Clients: We use this type when we want to create a client that represents a CLI (Command Line Interface) app, or a service that runs in the background.
Considering that the Database Action Scripts will be run automatically when users try to authenticate or to retrieve passwords, the best category for the client that we are creating is "Non Interactive Clients". After choosing the Client Type we can click on the "Create" button.
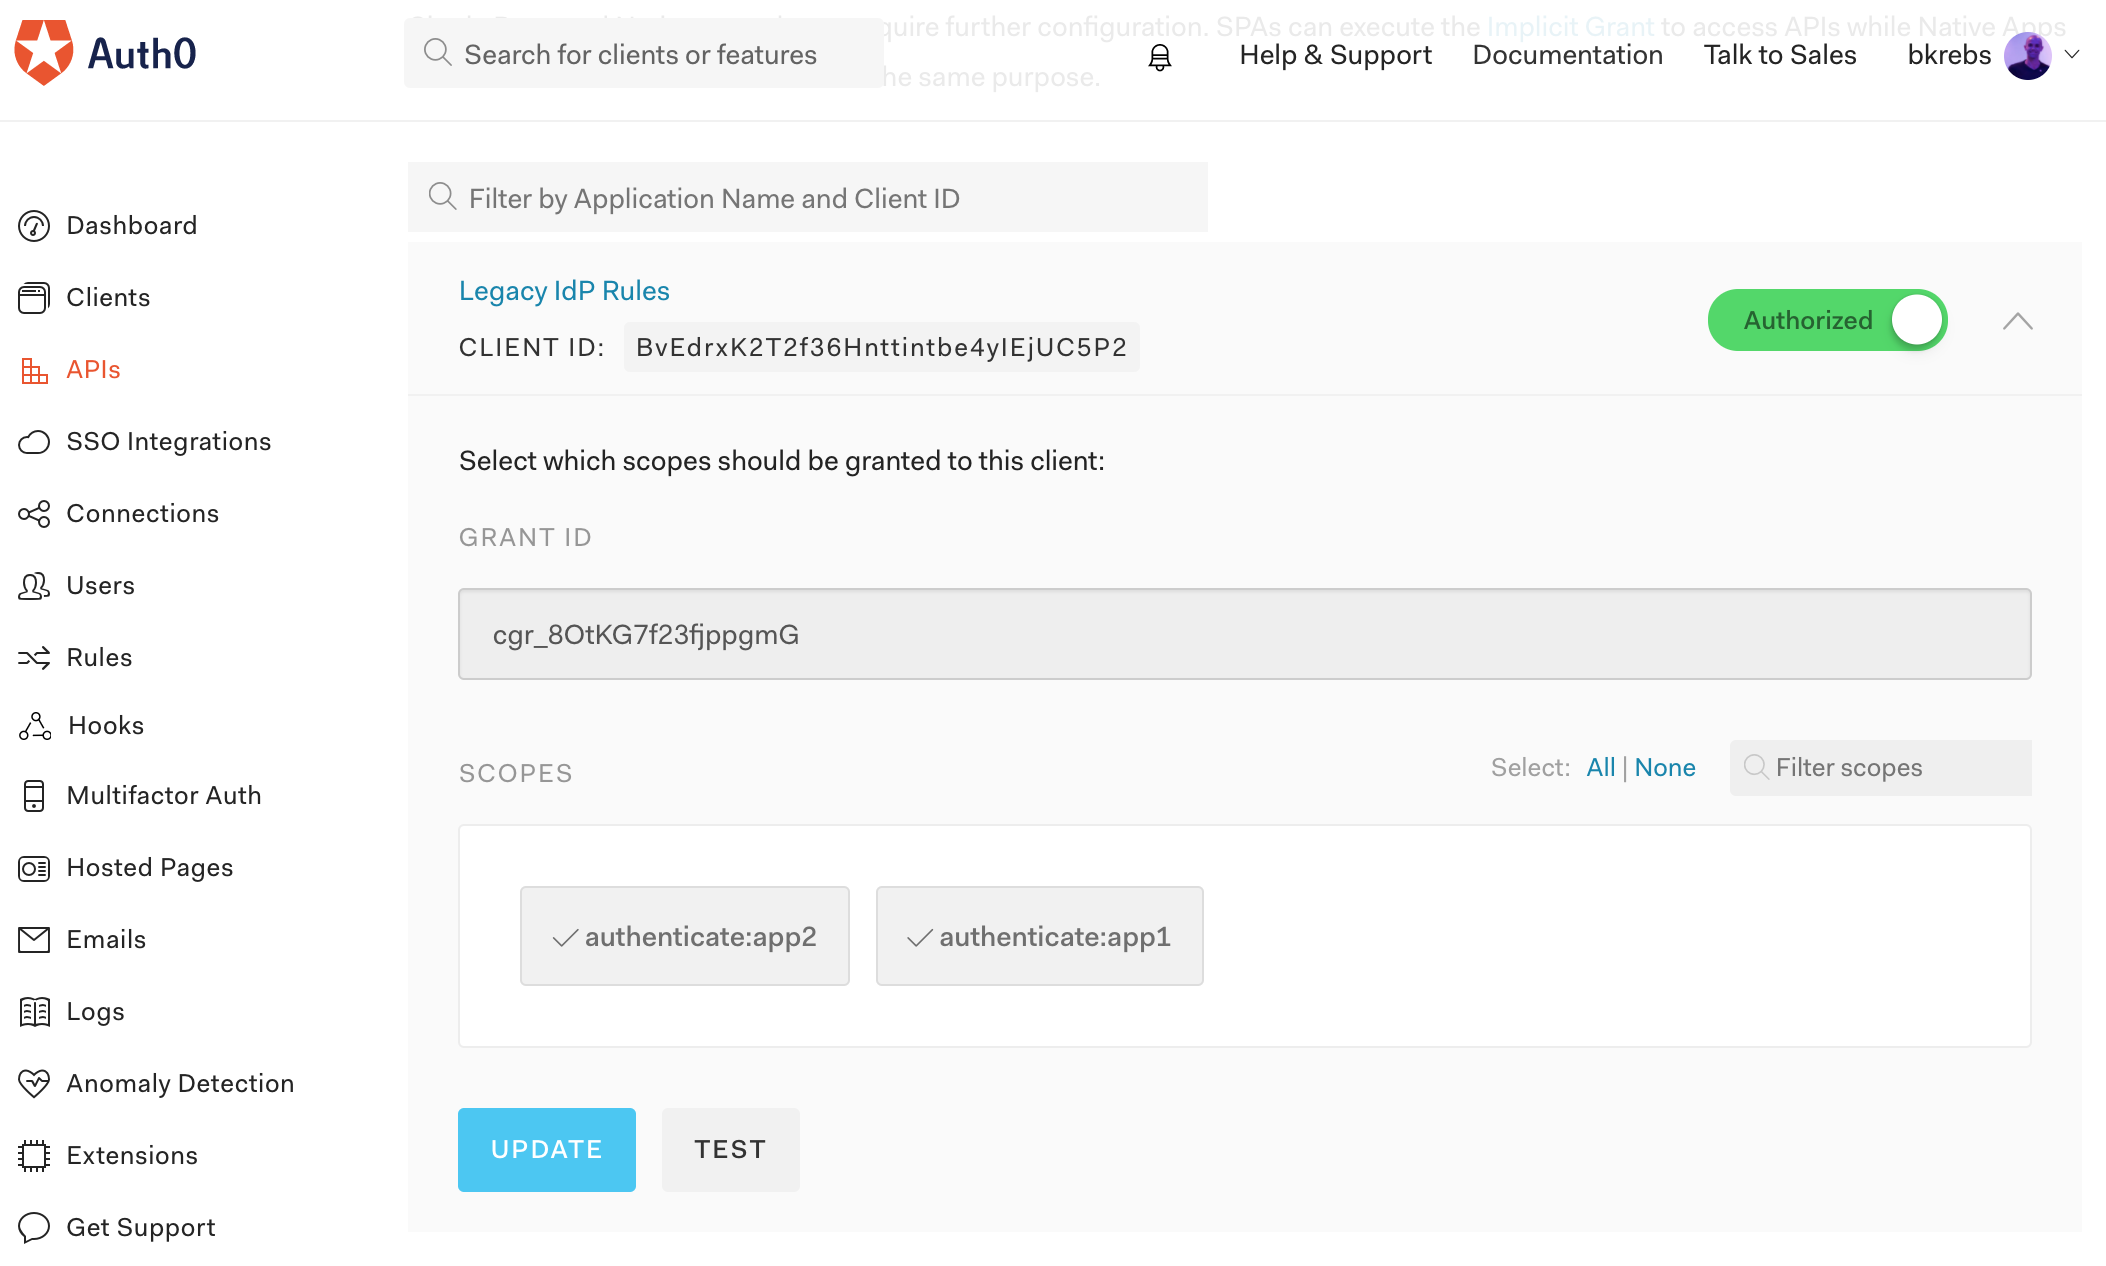
Clicking on this button will redirect us to the "Quick Start" tab on the newly created client. On this page we can choose the API that we created in the previous section, "Legacy IdP". As we haven't configured the API to accept connections from this new client, the dashboard will warn us that we have to navigate to the API to authorize the client. Let's click on this button and do two things:
- Let's turn on the switch for the "Legacy IdP Action Script" client on the page shown.
- Let's enable both scopes created before (
authenticate:app1andauthenticate:app2) in this client.
Merging Profiles on Authentication
Now that we have both the API and the Client properly created, we can configure the Login script in our database connection. To do that, let's access the "Custom Database" tab in the database connection that we created before (which we called profile-consolidation). On this tab we will replace the default source code with the following:
function login(email, password, callback) {
  "use strict";
  const request = require('request-promise@1.0.2');
  const Promise = require('bluebird@3.4.6');

  const authenticate = Promise.coroutine(function *() {
    const getTokenOptions = {
      method: 'POST',
      url: 'https://bkrebs.auth0.com/oauth/token',
      headers: {'content-type': 'application/json'},
      body: '{"client_id":"BvEdrxK2T2f36Hnttintbe4yIEjUC5P2", "client_secret":"13rf3mN0ciOEckabpE4TF4LYstBfOa19DYUBED7-MMzEM-CjR2ig_kifTfyy3Hoh","audience":"legacy-idp","grant_type":"client_credentials"}'
    };

    // gets an access token to communicate with the legacy identity resources
    const tokenResponse = yield request(getTokenOptions);
    const accessToken = JSON.parse(tokenResponse).access_token;

    //gets the user profile from the both application
    let profileApp1 = {};
    let profileApp2 = {};
    try {
      profileApp1 = JSON.parse(yield legacyAuth(accessToken, 'https://node-app-1.now.sh/users/authenticate'));
    } catch (e) { }

    try {
      profileApp2 = JSON.parse(yield legacyAuth(accessToken, 'https://node-app-2.now.sh/users/authenticate'));
    } catch (e) { }

    // removes null properties from both profile to make merge (assign) unaware of them
    Object.keys(profileApp1).forEach((key) => (profileApp1[key] === null) && delete profileApp1[key]);
    Object.keys(profileApp2).forEach((key) => (profileApp2[key] === null) && delete profileApp2[key]);

    // merges both profiles
    const profile = Object.assign({}, profileApp1, profileApp2, { email });
    return callback(null, profile);
  });

  authenticate().catch(function(e) {
    return callback(new Error(e));
  });

  function legacyAuth(accessToken, url) {
    const options = {
      method: 'POST',
      url: url,
      headers: {
        'Authorization': 'Bearer ' + accessToken,
        'content-type': 'application/json'
      },
      body: '{ "email": "' + email + '", "password": "' + password + '" }'
    };
    return request(options);
  }
}
To better understand what the code above does, let's break it into smaller pieces and inspect each part. The first thing we do in the script above is require two libraries: request-promise and bluebird. The request-promise library is used to send HTTP requests to the legacy identity providers. The second library, bluebird, is used to allow us to yield promises, which makes our code less verbose.
const request = require('request-promise@1.0.2');
const Promise = require('bluebird@3.4.6');
After requiring both libraries, the next step is to use bluebird to create a function that handles both the authentication and profile merging processes. Immediately after the function definition, we trigger it and define a callback to be executed when any error occurs. These errors are caught and used to end the whole authentication process.
  const authenticate = Promise.coroutine(function *() {
    // ...
  });

  authenticate().catch(function(e) {
    return callback(new Error(e));
  });
Inside the authenticate function, the first thing we do is send a request to Auth0 to get an access_token. We will use this token to authenticate the Database Action Scripts when issuing requests to the legacy identity providers.
const getTokenOptions = {
  method: 'POST',
  url: 'https://bkrebs.auth0.com/oauth/token',
  headers: {'content-type': 'application/json'},
  body: '{"client_id":"BvEdrxK2T2f36Hnttintbe4yIEjUC5P2", "client_secret":"13rf3mN0ciOEckabpE4TF4LYstBfOa19DYUBED7-MMzEM-CjR2ig_kifTfyy3Hoh","audience":"legacy-idp","grant_type":"client_credentials"}'
};

// gets an access token to communicate with the legacy identity resources
const tokenResponse = yield request(getTokenOptions);
const accessToken = JSON.parse(tokenResponse).access_token;
With the access_token on hand, we try to authenticate the user on both applications. As users can have a profile on one application but not on the other, we nest both calls in distinct try-catch blocks. If the authentication succeeds, one of the profile objects is replaced. If it fails, the profile object remains untouched (i.e. {}).
let profileApp1 = {};
let profileApp2 = {};
try {
  profileApp1 = JSON.parse(yield legacyAuth(accessToken, 'https://node-app-1.now.sh/users/authenticate'));
} catch (e) { }

try {
  profileApp2 = JSON.parse(yield legacyAuth(accessToken, 'https://node-app-2.now.sh/users/authenticate'));
} catch (e) { }
After fetching the profile(s) from the identity providers, we remove any null properties from the objects and merge them into one single profile object that is returned to Auth0.
// removes null properties from both profile to make merge (assign) unaware of them
Object.keys(profileApp1).forEach((key) => (profileApp1[key] === null) && delete profileApp1[key]);
Object.keys(profileApp2).forEach((key) => (profileApp2[key] === null) && delete profileApp2[key]);

// merges both profiles
const profile = Object.assign({}, profileApp1, profileApp2, { email });
return callback(null, profile);
The last piece of code defined in the Database Action Scripts is the legacyAuth function. This function is used to fetch user profiles. It achieves its goal by assembling and issuing a POST request that carries the access_token on the Authorization header with the user email and password on the request body.
function legacyAuth(accessToken, url) {
  const options = {
    method: 'POST',
    url: url,
    headers: {
      'Authorization': 'Bearer ' + accessToken,
      'content-type': 'application/json'
    },
    body: '{ "email": "' + email + '", "password": "' + password + '" }'
  };
  return request(options);
}
Testing the Authentication Process
Now that we have all the pieces together in the Login script, we can save it and then test to see the merging process in action. As explained before, the sample applications are populated with two different sets of users. The first application is filled with the following users:
| Password | Name | Surname | Address | City | |
|---|---|---|---|---|---|
| bruno@spam4.me | 123456 | Bruno | New York | ||
| serena@spam4.me | 123456 | Serena | Williams | New York |
And the second one contains the following users:
| Password | Name | Surname | Address | City | |
|---|---|---|---|---|---|
| bruno@spam4.me | 123456 | Bruno | Krebs | 5th Avenue | |
| venus@spam4.me | 123456 | Venus | Williams | New York |
Note that the user identified with the bruno@spam4.me email exists on both applications. Although present on both apps, the first one doesn't know the user's surname or address. The second app knows surname and address but not city. Therefore, if we use this user when testing the login script, we will end up with with a profile that contains all the properties (surname, address, and city).
To verify if this is what we get, let's:
- Access the Database Connections page.
- Click on the Try button (the last button, labeled with a play icon) of the
profile-consolidationdatabase. - Fill the form with
bruno@spam4.mein the email field and123456in the password field. - Click on the "Login" button on the bottom of the form.
This will bring up a screen saying that the authentication process worked, displaying the consolidated profile, as follows:
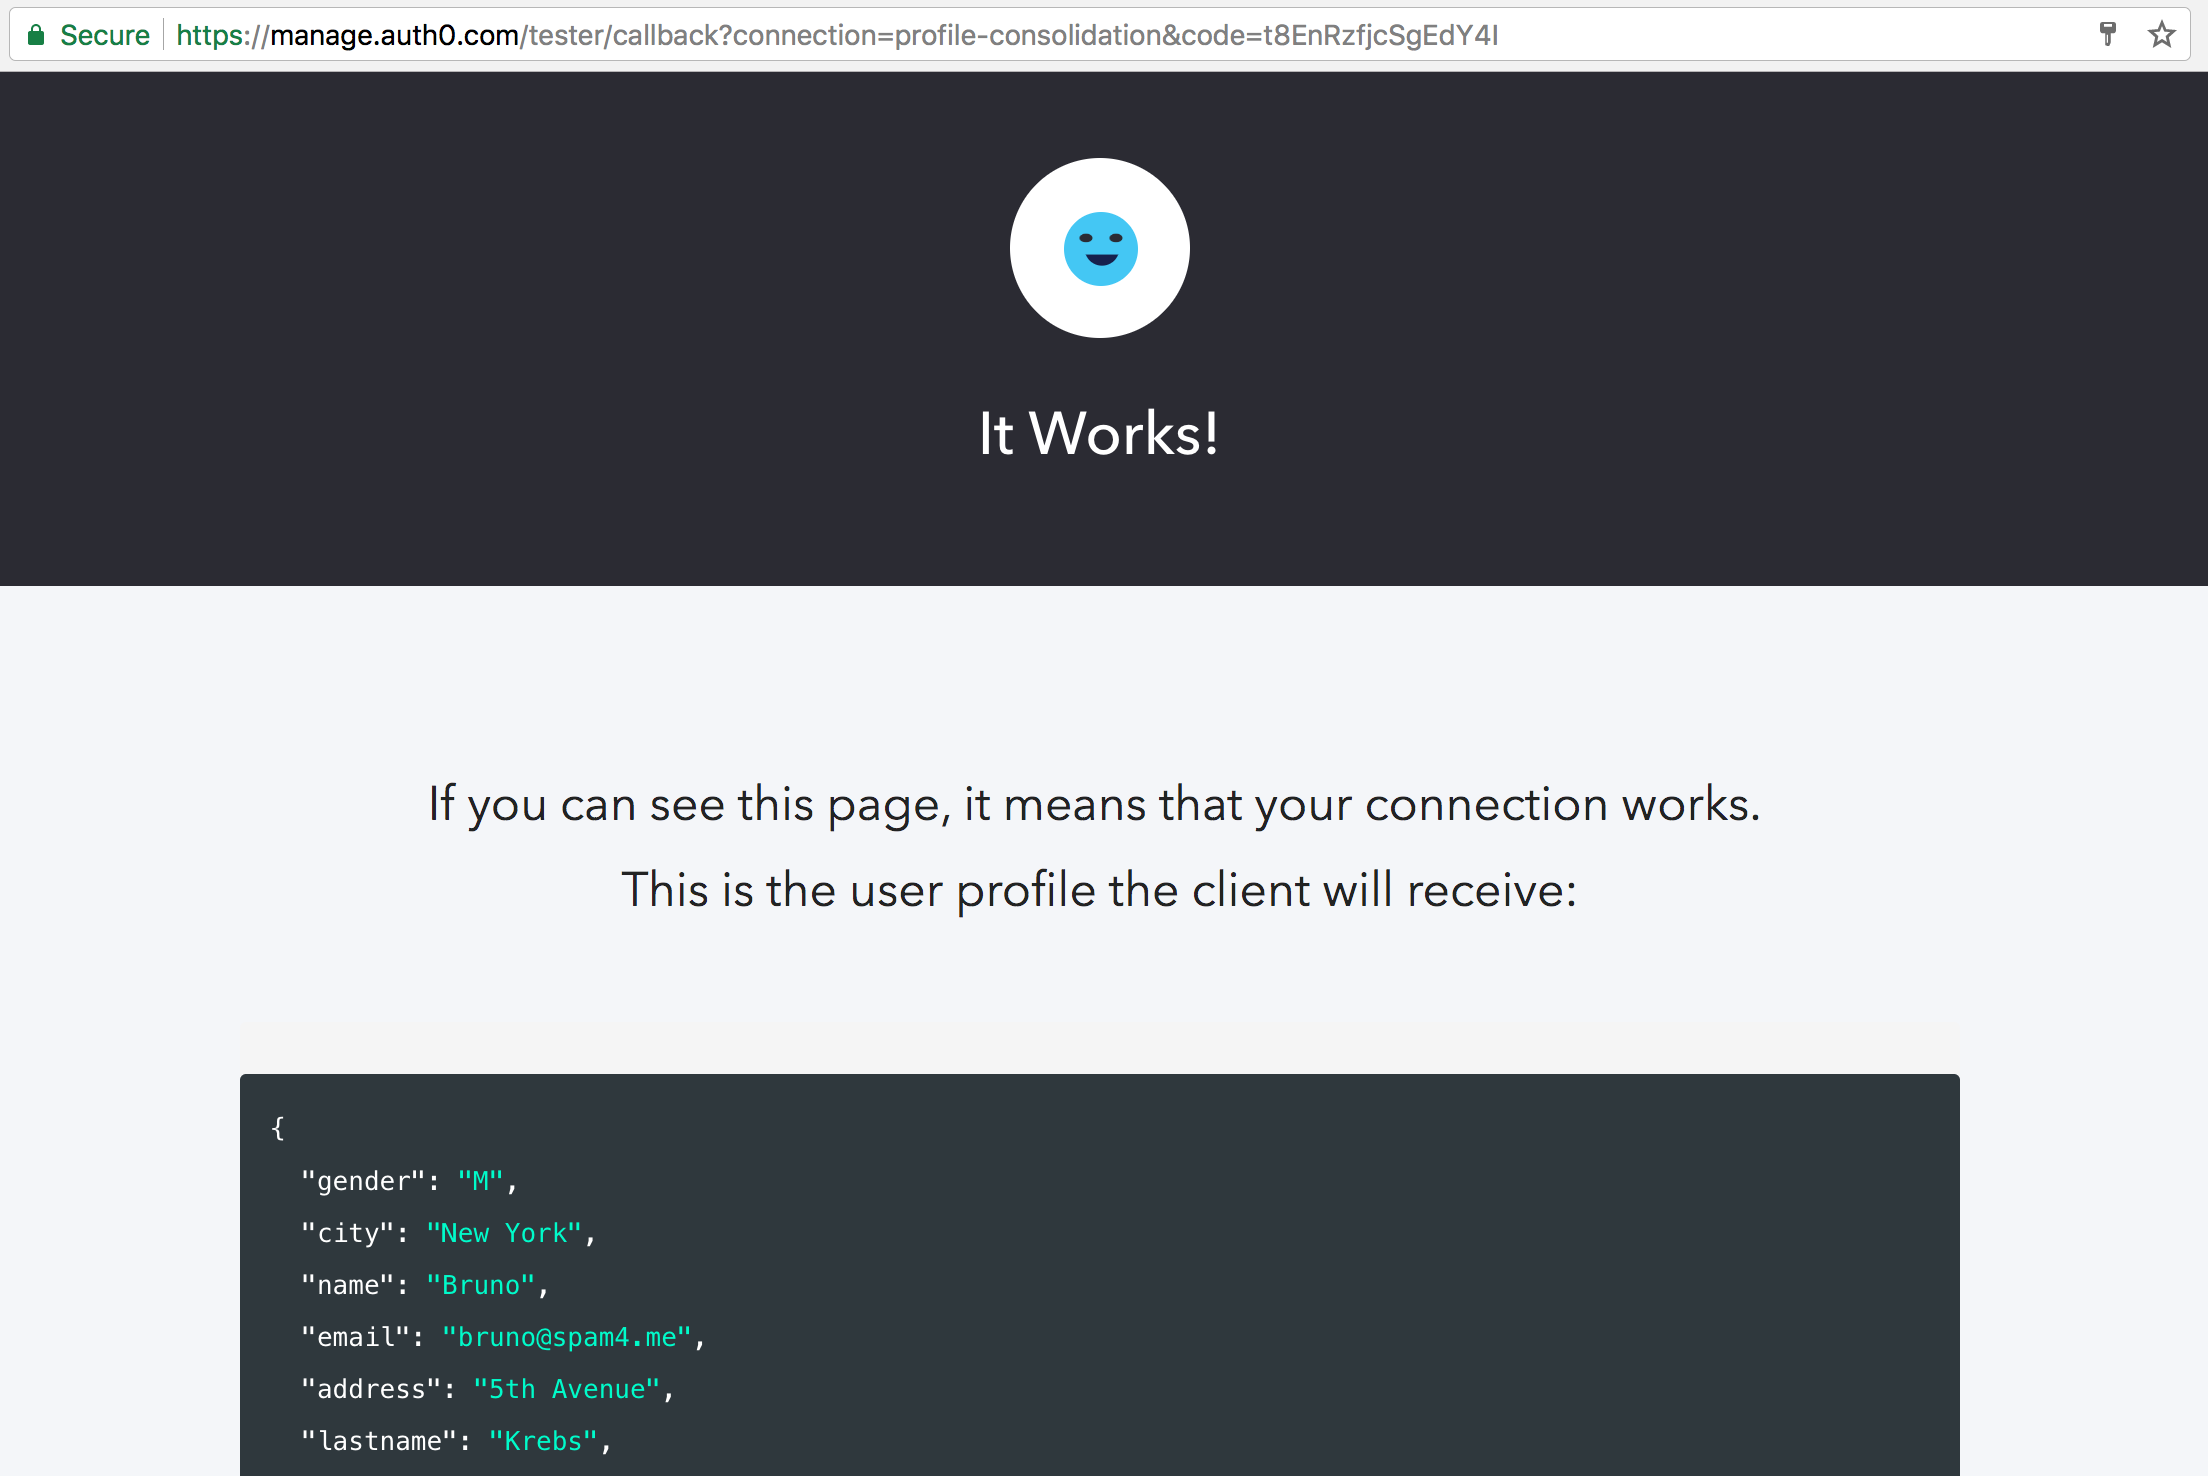
Besides the user that has an account on both legacy apps, there are two more users that have accounts on one application or another. serena@spam4.me has an account on the first application, but not on the second one, and venus@spam4.me vice versa. Therefore, if we test the authentication process again with one of these users, we will end up with the exact profile from the application where the user exists.
Managing Password Retrieval
Being Auth0 an enterprise-ready solution for identity management, it must come as no surprise that features like password retrieval/reset is supported out of the box. Although this feature is shipped by default, when merging profiles from multiple identities sources, we must teach Auth0 how to verify if a user exists on any of these sources. To do that, let's add the following code to the "Get User" subsection of the "Custom Database" tab:
function getByEmail(email, callback) {
  "use strict";
  const request = require('request-promise@1.0.2');
  const Promise = require('bluebird@3.4.6');

  const authenticate = Promise.coroutine(function *() {
    const getTokenOptions = {
      method: 'POST',
      url: 'https://bkrebs.auth0.com/oauth/token',
      headers: {'content-type': 'application/json'},
      body: '{"client_id":"BvEdrxK2T2f36Hnttintbe4yIEjUC5P2", "client_secret":"13rf3mN0ciOEckabpE4TF4LYstBfOa19DYUBED7-MMzEM-CjR2ig_kifTfyy3Hoh","audience":"legacy-idp","grant_type":"client_credentials"}'
    };

    // gets an access token to communicate with the legacy identity resources
    const tokenResponse = yield request(getTokenOptions);
    const accessToken = JSON.parse(tokenResponse).access_token;

    //gets the user profile from the both application
    let profileApp1 = {};
    let profileApp2 = {};
    try {
      profileApp1 = JSON.parse(yield legacyAuth(accessToken, 'https://node-app-1.now.sh/users/' + email));
    } catch (e) { }

    try {
      profileApp2 = JSON.parse(yield legacyAuth(accessToken, 'https://node-app-2.now.sh/users/' + email));
    } catch (e) { }

    // removes null properties from both profile to make merge (assign) unaware of them
    Object.keys(profileApp1).forEach((key) => (profileApp1[key] === null) && delete profileApp1[key]);
    Object.keys(profileApp2).forEach((key) => (profileApp2[key] === null) && delete profileApp2[key]);

    // merges both profiles
    const profile = Object.assign({}, profileApp1, profileApp2, { email });
    return callback(null, profile);
  });

  authenticate().catch(function(e) {
    return callback(new Error(e));
  });

  function legacyAuth(accessToken, url) {
    const options = {
      method: 'GET',
      url: url,
      headers: {
        'Authorization': 'Bearer ' + accessToken
      }
    };
    return request(options);
  }
}
Attentive readers will notice that the code to check if a user exists on any of the legacy identity sources is quite similar to the code used to log users in. The only real difference is that instead of sending users credentials in a POST request to /users/authenticate, we now issue a GET request to /users/:email replacing :email with the email address informed by the user. With this code in place, Auth0 now have the means to securely enable users to create new passwords for their accounts.
Refactoring Legacy Applications to use Auth0
Besides implementing the Login script to verify user credentials and merge profiles from multiple sources, we also need to refactor legacy applications to replace the current authentication mechanism. That is, whenever users reach the application and try to log in, we need to show them the Auth0 login screen instead of the old one. Not only that, the application must understand that the user is authenticated. Although this might sound like more hard work, Auth0 smoothes the refactoring process by providing open source libraries for the most commonly-used technologies, and by providing great documentation and examples.
Heading to Auth0 Docs, we can see that technologies are organized by application type (Native App, SPAs, Web App, and Backend). Selecting one of these types opens up a range of popular technologies that we can choose from to learn how the integration works. For example, if we choose the Web App type, we will see a screen that contains documentation to technologies like ASP.NET, Apache, Go, Java, Node.js, PHP, and so on.
Conclusion
The scenario that the hardware manufacturer was dealing with before moving to Auth0 is pretty common. Companies all around the world usually have multiple applications that support their operations and, more often than not, each application contains its own identity management system. This situation has many disadvantages.
For example, it's not trivial to keep track of multiple credentials spread around multiple applications. The more apps we add to our daily operations, the more credentials we have to manage. Besides that, this can introduce a security issue as not all software providers have the knowledge required, or the time necessary, to implement all the security measures needed to keep our sensitive data secure.
Luckily, as we saw throughout this article, using Auth0 to consolidate identities from multiple applications is quite straightforward. In just a few minutes we can set up an Auth0 account that can communicate to as many legacy applications as needed to fetch users and merge on a single source of truth. Moreover, having a single identity provider makes it easier to enhance security with features like Multifactor Authentication and Passwordless.
“Having a single IdP makes it easy to enhance security with Multifactor Authentication and Passwordless.”
Tweet This
About the author

Bruno Krebs
R&D Content Architect (Auth0 Alumni)