
The focus of this guide is to help developers learn how to secure an Angular application by implementing user authentication. You'll enhance an Angular starter application to practice the following security concepts:
- Add user login and logout.
- Retrieve user profile information.
- Protect application routes.
- Call an API with protected endpoints.
This tutorial uses the Auth0 Angular SDK to secure Angular applications. The SDK abstracts a lot of authentication implementation details to help you follow security best practices using an idiomatic Angular approach while writing less code. You don't need to be an expert on OAuth 2.0 or OpenID Connect to understand how to secure your web application stack.
⏰⚡️ If you are short of time, check out the Auth0 Angular Quickstart.
Get the Starter Application
Look for the 🛠️️ emoji if you'd like to skim through the content while focusing on the build steps.
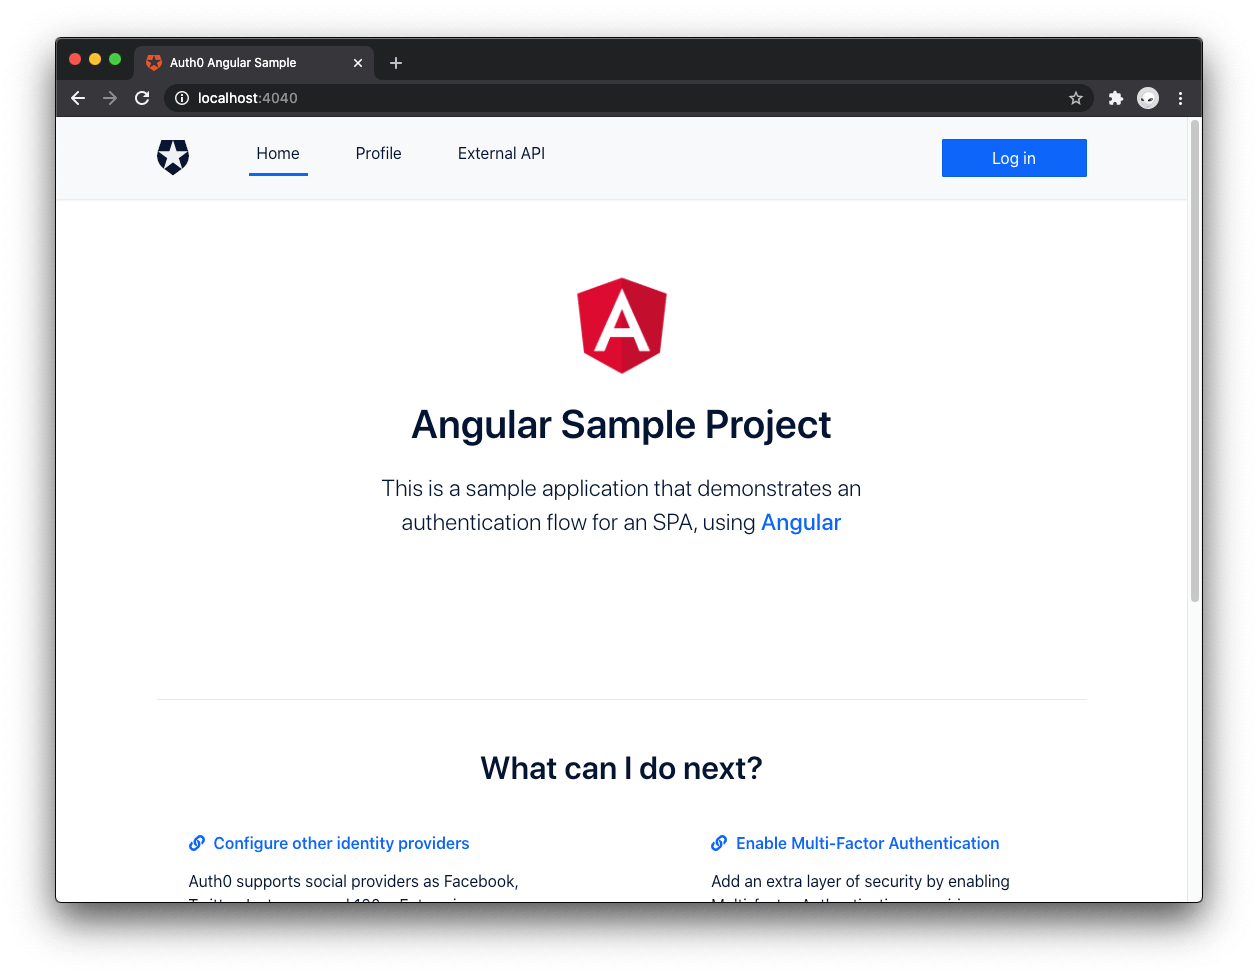
We have created a starter project using the Angular CLI to help you learn Angular security concepts through hands-on practice. The starter project uses a custom Bootstrap theme to style and layout the application so that you can focus on building and wiring Angular components.
🛠 As such, clone the auth0-angular-sample repository on its starter branch to get started:
git clone -b starter git@github.com:auth0-blog/auth0-angular-sample.git
🛠 Once you clone the repo, make auth0-angular-sample your current directory:
cd auth0-angular-sample
🛠 Proceed to install the Angular project dependencies:
npm install
🛠 Finally, run the Angular application:
npm start
Connect Angular with Auth0
Why use Auth0 instead of building your own user authentication from scratch?
In the past, wise folks warned, "thou shalt not roll thee own crypto". Today, wise folks advise that "you don't need to build your own authentication".
Building a comprehensive authentication and authorization system from scratch is complex. Auth0 is an Identity-as-a-Service (IDaaS) platform that lets you centralize user authentication and API authorization for all your applications to reduce that complexity.
Auth0 offers powerful security features out-of-the-box. A customizable login page, social login, Multi-Factor Authentication (MFA), and advanced user management allow you to go live in record time. Perhaps the most important feature is anomaly detection, which helps you combat credential stuff attacks.
At Auth0, credential stuffing attacks account for, on average, nearly half of all login attempts using our platform. Read more details about this critical attack vector: Credential Stuffing Attacks: What Are They and How to Combat Them.
How does Auth0 work?
You start by integrating Auth0 with your Angular application.
When your users need to log in, your Angular application triggers an authentication event, which it handles by redirecting them to a customizable Auth0 login page.
Once your users log in successfully, Auth0 redirects them back to your Angular application, returning tokens with their authentication and user information.
Additionally, you can protect your APIs with Auth0 so that you can use an access token to make a request from your Angular application to your protected API endpoints.
How easy is it to get started?
Very easy! Just follow these steps:
Configure an Auth0 Application
If you haven't already,
sign up for a free Auth0 account →A free account offers you:
- 7,000 free active users and unlimited logins.
- A centralized, ready-to-ship login page for Web, iOS & Android.
- Up to 2 social identity providers like Google and Facebook login.
- Unlimited serverless Rules to customize and extend Auth0's capabilities.
During the sign-up process, you create something called an Auth0 Tenant, which is a container that Auth0 uses to store your identity service configuration and your users in isolation. No other Auth0 customer can peek into or access your tenant.
🛠 Once you sign in, Auth0 takes you to the Dashboard, where you can manage and configure your identity services. In the left sidebar menu, click on "Applications".
🛠 Then, click the "Create Application" button. A modal opens up with a form to provide a name for the application and choose its type.
- Name:
Auth0 Angular Sample
- Application Type:
Single Page Web Applications
🛠 Click the "Create" button to complete the process. Your Auth0 application page loads up.
In the next step, you'll learn how to help Angular and Auth0 communicate using configuration data from that page — don't close it yet.
What's the relationship between Auth0 Tenants and Auth0 Applications?
Let's say that you have a photo-sharing Angular app called "Angulogram". You then would create an Auth0 tenant called angulogram.
Now, say that Angulogram is available on three platforms: web as a single-page application and a native mobile app for Android and iOS. If each platform needs authentication, you need to create three Auth0 applications to provide the product with everything it needs to authenticate users through that platform.
Create a communication bridge between Angular and Auth0
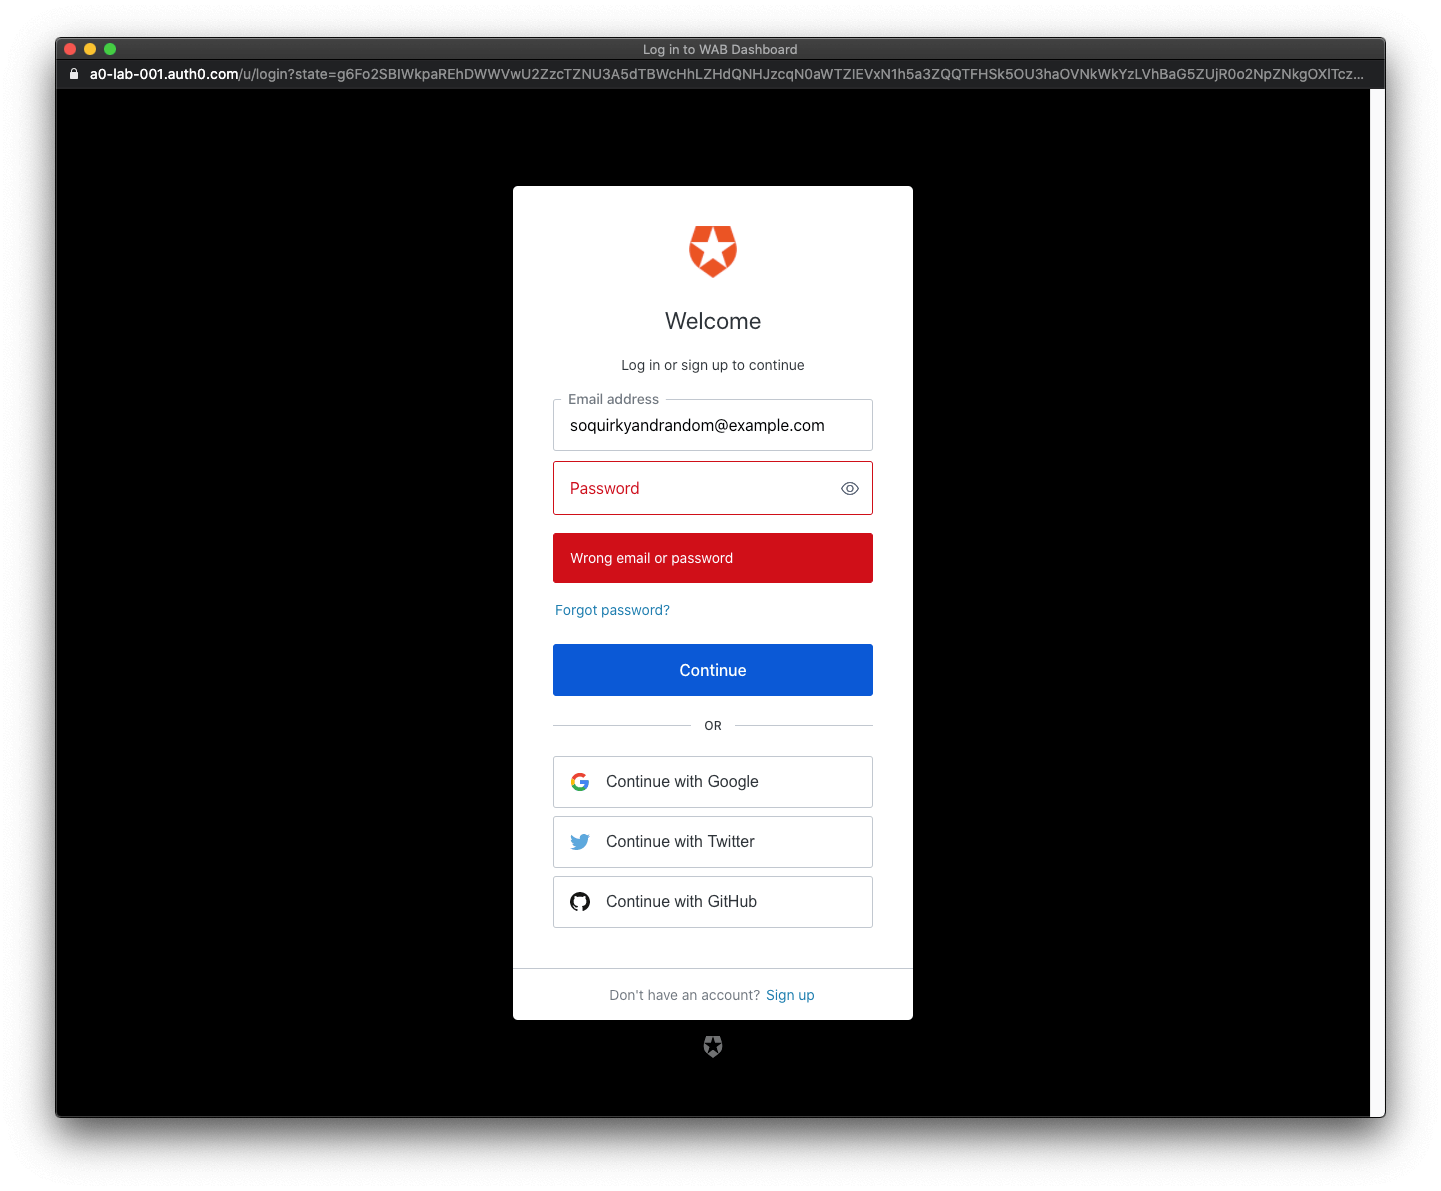
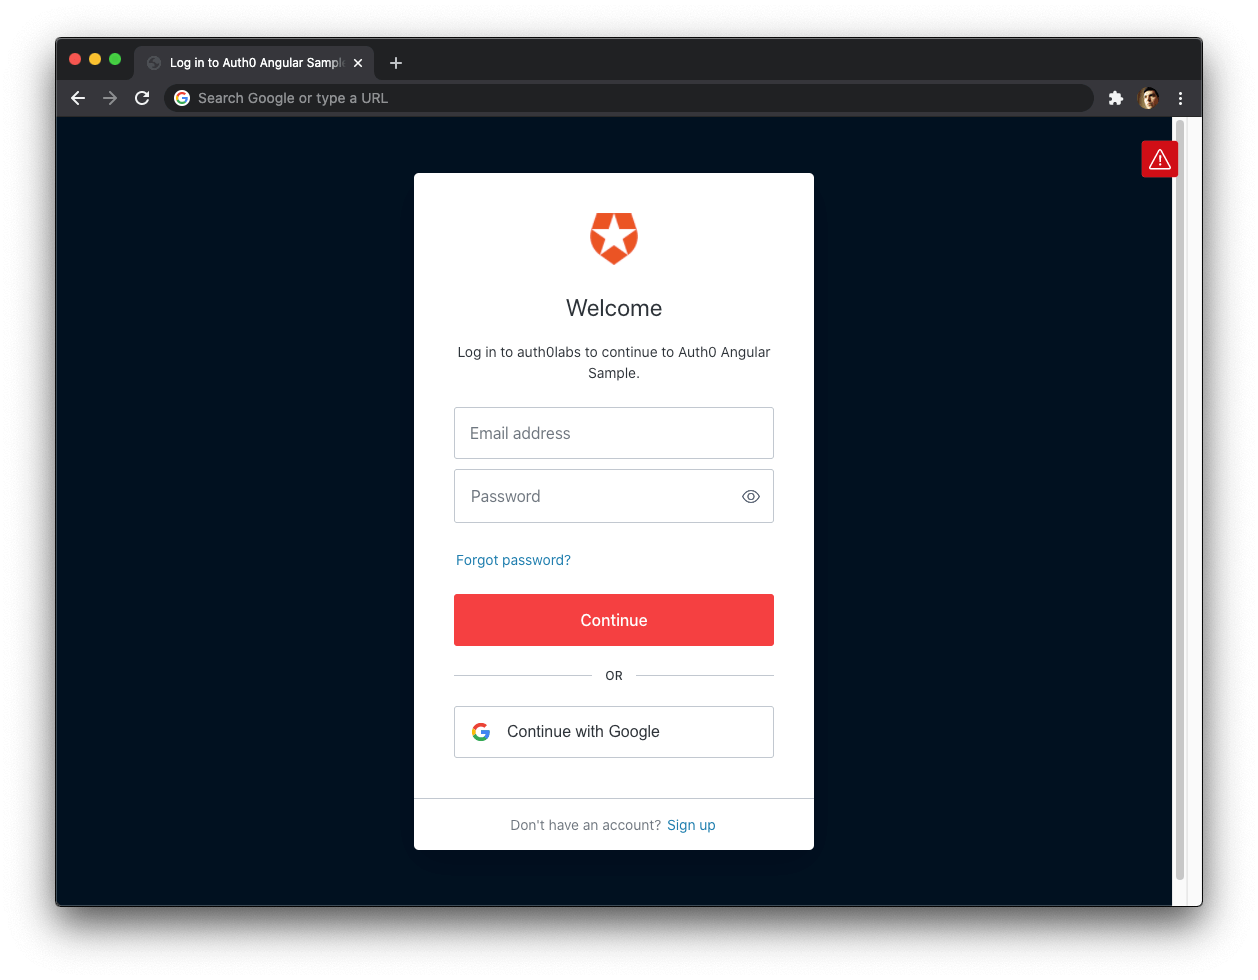
When you use Auth0, there's no need to build login forms. Auth0 offers a Universal Login page to reduce the overhead of adding and managing authentication.
It's important to highlight that the Auth0-provided form (Auth0 Universal Login) mitigates the risk of username and password enumeration. Auth0 Universal Login implements authentication error messages correctly following the recommendations of OWASP (The Open Web Application Security Project): say enough to help the user who is logging in but don't say too much to help the attacker trying to break in.
How does Universal Login work?
Your Angular application will redirect users to Auth0 whenever they trigger an authentication request. Auth0 will present them with the Universal Login page. Once they log in, Auth0 will redirect them to your application. For that redirecting to happen securely, you must specify in your Auth0 Application Settings the URLs to which Auth0 can redirect users once it authenticates them.
🛠 As such, click on the "Settings" tab of your Auth0 Application page and fill in the following values:
🛠 Allowed Callback URL
http://localhost:4040
After your users successfully log in, Auth0 can only redirect them to any of the URLs you list here.
🛠 Allowed Logout URL
http://localhost:4040
After your users log out, Auth0 can only redirect them to any of the URLs you list here.
🛠 Allowed Web Origins
http://localhost:4040
Using the Auth0 Angular SDK, your Angular application will make requests under the hood to an Auth0 URL to handle authentication requests. As such, you need to add your Angular application origin URL to avoid Cross-Origin Resource Sharing (CORS) issues.
🛠 Scroll down and click the "Save Changes" button.
🛠 Don't close this page yet as you'll need some of its information in the next section.
Add the Auth0 configuration variables to Angular
From the Auth0 Application Settings page, you need the Auth0 Domain and Client ID values to allow your Angular application to use the communication bridge you just created:
What exactly is an Auth0 Domain and an Auth0 Client ID?
Domain
Auth0 asked to pick a name for your Tenant when you created a new Auth0 account. That Tenant name, appended with auth0.com, is your Auth0 Domain. Once you prepend it with the https:// protocol, you obtain the base URL that your Angular application can use to redirect users to log in and to access the Auth0 APIs:
https://<TENANT-NAME>.auth0.com
Auth0 also supports custom domains for you to uphold your brand during the authentication process.
Client ID
Auth0 assigns a Client ID to each application you create in the Auth0 Dashboard. The Client ID is an alphanumeric string that uniquely identifies your application in your Auth0 tenant (such as q8fij2iug0CmgPLfTfG1tZGdTQyGaTUA). You cannot modify this value. You will use the Client ID to identify the Auth0 Application to which the Auth0 Angular SDK needs to connect.
Warning: Another important piece of information present in the "Settings" is the Client Secret. This secret protects your resources by only granting tokens to requestors if they're authorized. Think of it as your application's password, which must be kept confidential at all times. If anyone gains access to your Client Secret, they can impersonate your application and access protected resources.
🛠 Open the Angular starter project, auth0-angular-sample, and create an auth_config.json file under the project directory:
- macOS/Linux:
touch auth_config.json
- Windows Powershell:
ni auth_config.json
🛠 Populate auth_config.json as follows:
{
  "domain": "YOUR_AUTH0_DOMAIN",
  "clientId": "YOUR_AUTH0_CLIENT_ID"
}
🛠 Head back to your Auth0 application page. Follow these steps to get the domain and clientId values:
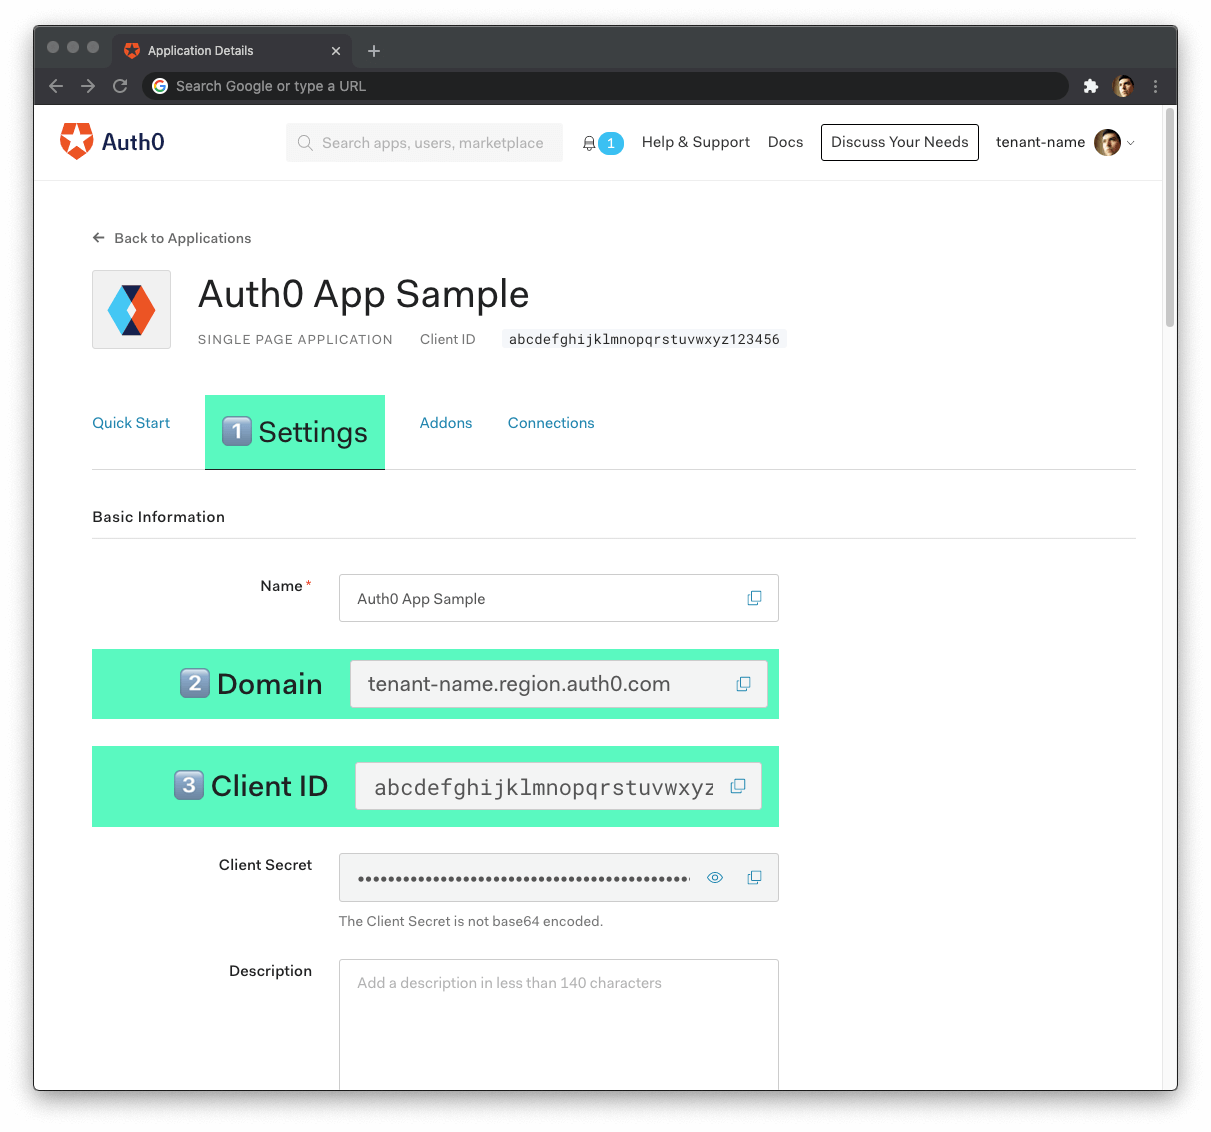
🛠 Click on the "Settings" tab, if you haven't already.
🛠 Use the "Domain" value from the "Settings" as the value of
domaininauth_config.json.🛠 Use the "Client ID" value from the "Settings" as the value of
clientIdinauth_config.json.
These variables let your Angular application identify itself as an authorized party to interact with the Auth0 authentication server to carry out the authentication process. You are mapping your Angular application to an Auth0 application.
To use these variables within your Angular application, you'll leverage the Angular environment module.
🛠 Replace the content of src/environments/environment.ts with the following:
// src/environments/environment.ts

import { domain, clientId } from '../../auth_config.json';

export const environment = {
  production: false,
  auth: {
    domain,
    clientId,
    redirectUri: window.location.origin,
  },
};
How is it possible to import JSON files within an Angular module? The starter project has a tsconfig.base.json file that sets the resolveJsonModule to true, which allows you to import and extract types from .json files.
Auth0 and Angular connection set
You have completed setting up an authentication service that your Angular application can consume. All that is left is for you to continue building up the starter project throughout this tutorial by adding security components and features.
Feel free to dive deeper into the Auth0 Documentation to learn more about how Auth0 helps you save time on implementing and managing identity.
Set Up the Auth0 Angular SDK
🛠 You need to follow these steps to integrate the Auth0 Angular SDK with your Angular application.
Install the Auth0 Angular SDK
🛠 Execute the following command:
ng add @auth0/auth0-angular@1.11.1
The Auth0 Angular SDK exposes several methods, variables, and types that help you integrate Auth0 with your Angular application idiomatically, including an authentication module and service.
Register and configure the authentication module
The SDK exports a module with the components and services you need to perform user authentication. Import this module into AppModule to access it through Angular's dependency injection framework.
🛠 Import AuthModule and environment right above the @NgModule definition in src/app/app.module.ts as follows:
// src/app/app.module.ts

// Other imports...

import { AuthModule } from '@auth0/auth0-angular';
import { environment as env } from '../environments/environment';

@NgModule({...})
export class AppModule {}
🛠 Then, add AuthModule to the AppModule imports and initialize it:
// src/app/app.module.ts

// All imports...

@NgModule({
  declarations: [...],
  imports: [
    BrowserModule,
    AppRoutingModule,
    HttpClientModule,
    FontAwesomeModule,
    // 👇 add and initialize AuthModule
    AuthModule.forRoot({
      ...env.auth,
    }),
  ],
  bootstrap: [...],
})
export class AppModule {}
You use the forRoot() pattern to configure AuthModule, which takes an object with the domain and clientId properties. You create that configuration object by spreading the env.auth object.
User authentication is a mechanism to monitor who is accessing your application and control what they can do. For example, you can prevent users who have not logged in from accessing parts of your application. In that scenario, Auth0 can act as your application bouncer.
A bouncer is a person employed by a nightclub or similar establishment to prevent troublemakers from entering or to eject them from the premises. Angular security is not too different from nightclub security.
If users want to enter a protected route from your application, Auth0 will stop them and ask them to present their credentials. If Auth0 can verify who they are and that they are supposed to go in there, Auth0 will let them in. Otherwise, Auth0 will take them back to a public application route.
Now, it's important to reiterate that the authentication process won't happen within your application layer. Your Angular application will redirect your users to the Auth0 Universal Login page, where Auth0 asks for credentials and redirects the user back to your application with the result of the authentication process.
The Auth0 Angular SDK is all set up. You are ready to create components to implement the authentication flow in the next section.
Add User Authentication
The Auth0 Angular SDK gives you methods to trigger authentication events within Angular components: login, logout, and sign up.
Create a login button
🛠 Create a LoginButtonComponent under the src/components/ directory using the Angular CLI:
ng generate component components/login-button --inlineStyle --skipTests
🛠 Populate the login-button.component.ts file in the src/app/components/login-button/ directory like so:
// src/app/components/login-button/login-button.component.ts

import { Component, OnInit } from '@angular/core';
import { AuthService } from '@auth0/auth0-angular';

@Component({
  selector: 'app-login-button',
  templateUrl: './login-button.component.html',
  styles: [],
})
export class LoginButtonComponent implements OnInit {
  constructor(public auth: AuthService) {}

  ngOnInit(): void {}

  loginWithRedirect(): void {
    this.auth.loginWithRedirect();
  }
}
🛠 Next, populate the login-button.component.html template file in the src/app/components/login-button/ directory like so:
<!-- src/app/components/login-button/login-button.component.html -->

<button class="btn btn-primary btn-block" (click)="loginWithRedirect()">
  Log in
</button>
Within the LoginButtonComponent definition, auth.loginWithRedirect() is a method exposed by AuthService. This method prompts the users to authenticate and confirm consent, which means to authorize your Angular application to access certain data on behalf of the user. In your current context, this means that your Angular application redirects the user to the Auth0 Universal Login page to carry out the authentication process. You'll see this in action in the next sections.
You can customize the login experience by passing a configuration object as an argument to loginWithRedirect(). For example, you can pass options to loginWithRedirect() to redirect users to an Auth0 Universal Login page optimized for signing up for your Angular application. See RedirectLoginOptions for more details on these options.
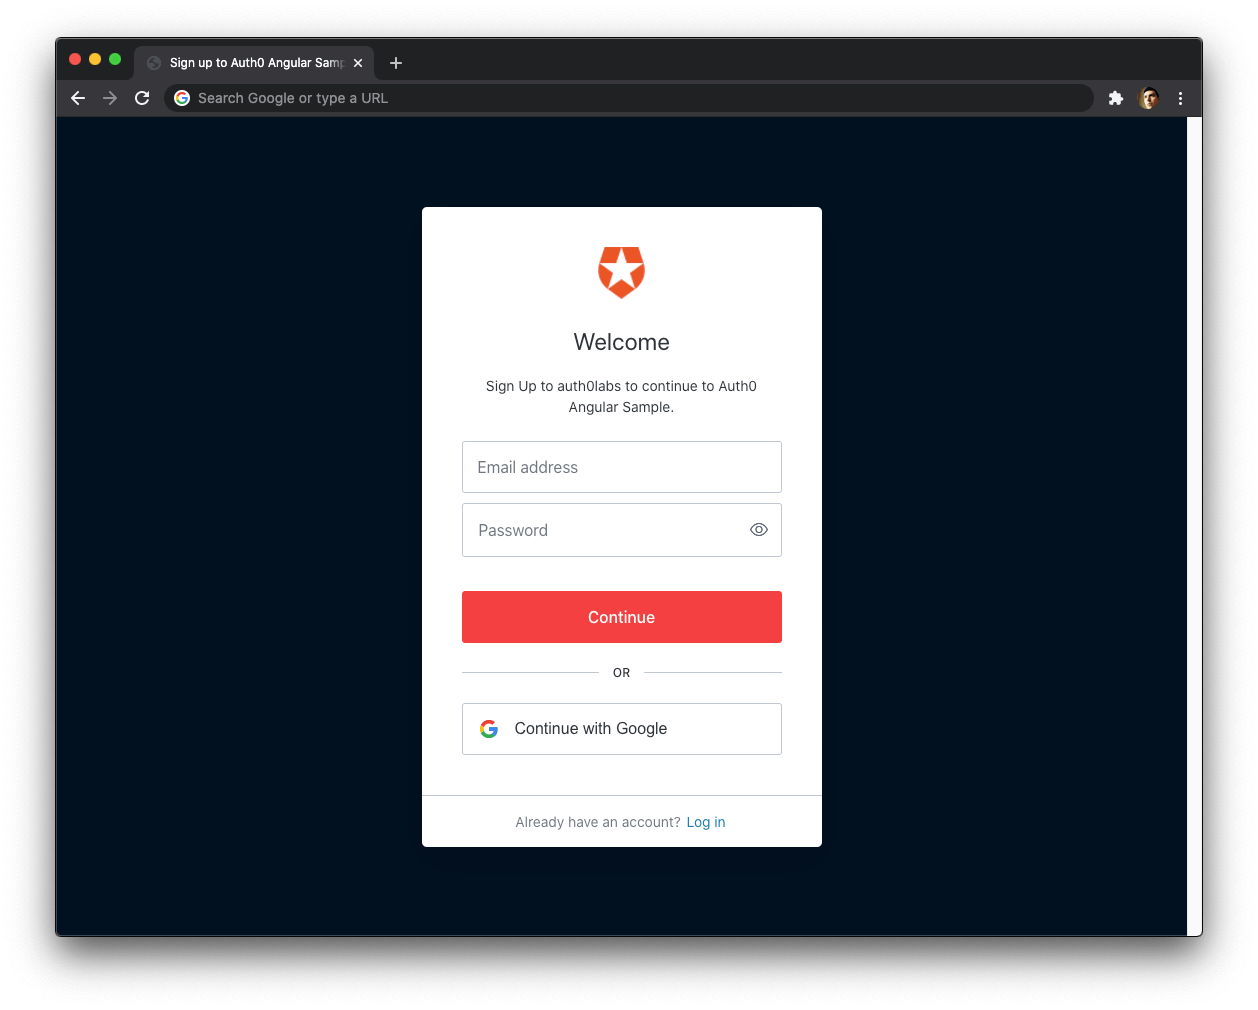
Create a sign-up button
You can make users land directly on a sign-up page instead of a login page by adding the screen_hint property to the configuration object of auth.loginWithRedirect():
{
  screen_hint: "signup",
}
🛠 Create a SignupButtonComponent under the src/components/ directory using the Angular CLI:
ng generate component components/signup-button --inlineStyle --skipTests
🛠 Populate the signup-button.component.ts file in src/app/components/signup-button/ like so:
// src/app/components/signup-button/signup-button.component.ts

import { Component, OnInit } from '@angular/core';

import { AuthService } from '@auth0/auth0-angular';

@Component({
  selector: 'app-signup-button',
  templateUrl: './signup-button.component.html',
})
export class SignupButtonComponent implements OnInit {
  constructor(public auth: AuthService) {}

  ngOnInit(): void {}

  loginWithRedirect(): void {
    this.auth.loginWithRedirect({ screen_hint: 'signup' });
  }
}
🛠 Populate the signup-button.component.html template file in src/app/components/signup-button/ like so:
<button class="btn btn-primary btn-block" (click)="loginWithRedirect()">
  Sign Up
</button>
The sign-up feature requires you to enable the Auth0 New Universal Login Experience in your Tenant.
🛠 Open the Universal Login section of the Auth0 Dashboard and choose the "New" option under the "Experience" subsection.
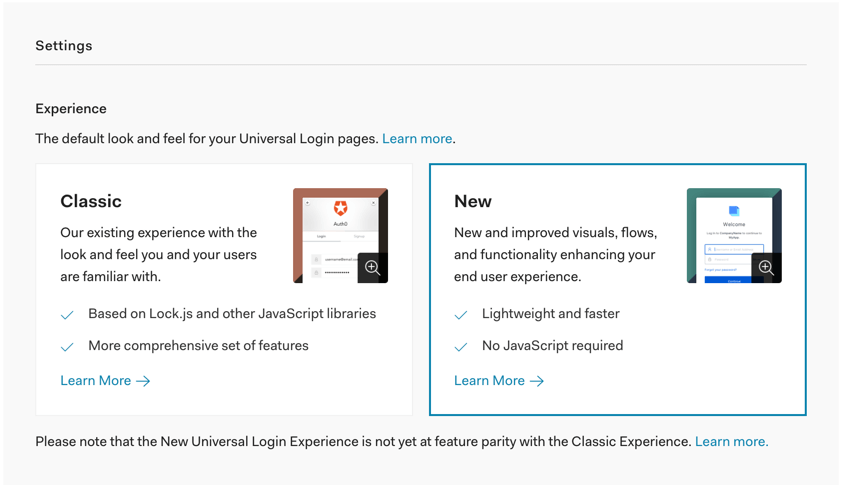
🛠 Scroll down and click on the "Save Changes" button.
The difference between the LoginButtonComponent and SignupButtonComponent user experience will be more evident once you integrate those components in your Angular application and see them in action. You'll do that in the next sections.
Create a logout button
🛠 Create a LogoutButtonComponent under the src/components/ directory as follows:
ng generate component components/logout-button --inlineStyle --skipTests
🛠 Populate the logout-button.component.ts file in src/app/components/logout-button/ with this code:
// src/app/components/logout-button/logout-button.component.ts

import { Component, Inject, OnInit } from '@angular/core';
import { AuthService } from '@auth0/auth0-angular';
import { DOCUMENT } from '@angular/common';

@Component({
  selector: 'app-logout-button',
  templateUrl: './logout-button.component.html',
  styles: [],
})
export class LogoutButtonComponent implements OnInit {
  constructor(
    public auth: AuthService,
    @Inject(DOCUMENT) private doc: Document,
  ) {}

  ngOnInit(): void {}

  logout(): void {
    this.auth.logout({ returnTo: this.doc.location.origin });
  }
}
You are defining a logout() method that triggers the logout event. You pass it an optional configuration object to tell Auth0 where to take users after it logs them out.
🛠 Next, populate the logout-button.component.html template file in the src/app/components/logout-button/ directory like so:
<!--src/app/components/logout-button/logout-button.component.html-->

<button class="btn btn-danger btn-block" (click)="logout()">Log out</button>
The auth.logout() method exposed by AuthService clears the application session and redirects to the Auth0 /v2/logout endpoint to clear the Auth0 session. As with the login methods, you can pass a configuration object to logout() to define parameters for the /v2/logout call. This process is fairly invisible to the user. See LogoutOptions for more details.
Here, you add the returnTo property to the configuration object to specify the URL where Auth0 should redirect your users after they logout. Right now, you are working locally, and your Auth0 application's "Allowed Logout URLs" point to http://localhost:4040.
However, if you were to deploy your Angular application to production, you need to add the production logout URL to the "Allowed Logout URLs" list and ensure that Auth0 redirects your users to that production URL and not localhost. Setting returnTo to this.doc.location.origin will do just that.
Angular components don't have direct access to the document object. However, you can @Inject the DOCUMENT constant as a dependency on AuthenticationButtonComponent. this.doc is the same as the DOM document in the browser. this.doc.location returns a Location object whose origin property is the origin of your application.
Integrate the login and logout buttons
Let's wrap LoginButtonComponent and LogoutButtonComponent in a single component that has logic to decide which button to render depending on the authentication status of the user.
🛠 Create an AuthenticationButtonComponent under the src/app/components/ directory:
ng g c components/authentication-button --inlineStyle --skipTests
You are using the shorthand
g(generate) andc(component) to make the command shorter.
🛠 Populate the authentication-button.component.ts file in the src/app/components/authentication-button/ directory like so:
// src/app/components/authentication-button/authentication-button.component.ts

import { Component, OnInit } from '@angular/core';
import { AuthService } from '@auth0/auth0-angular';

@Component({
  selector: 'app-authentication-button',
  templateUrl: './authentication-button.component.html',
  styles: [],
})
export class AuthenticationButtonComponent implements OnInit {
  constructor(public auth: AuthService) {}

  ngOnInit(): void {}
}
🛠 Populate the authentication-button.component.html file in the src/app/components/authentication-button/ directory like so:
<!--
src/app/components/authentication-button/
  authentication-button.component.html
-->

<app-login-button *ngIf="(auth.isAuthenticated$ | async) === false">
</app-login-button>

<app-logout-button *ngIf="auth.isAuthenticated$ | async"> </app-logout-button>
Let's start with understanding what's happening in the template. auth.isAuthenticated$ is an Observable exposed by AuthService that emits a boolean value. Its value is true when Auth0 has authenticated the user and false when it hasn't.
It's important to note that, under the hood, auth.isAuthenticated$ only starts emitting values once the Auth0 Angular SDK has finished loading. When AuthService.isLoading$ emits false, then auth.isAuthenticated$ emits its value. This operation piping helps prevent false positives in relation to the authentication status of a user. This also causes a small delay in the rendering of the AuthenticationButtonComponent, but you'll fix that soon.
There are some advantages to using this AuthenticationButtonComponent component wrapper:
You can build flexible interfaces. AuthenticationButtonComponent serves as a "log in/log out" switch that you can put anywhere you need that switch functionality. However, you still have separate LoginButtonComponent and LogoutButtonComponent for cases when you need their functionality in isolation. For example, you may have a logout button on a page that only authenticated users can see.
You can build extensible interfaces. You can easily swap the LoginButtonComponent with the SignupButtonComponent in AuthenticationButtonComponent to create a "sign up/log out" switch. You could also wrap the "sign up/log out" switch in a NewAuthenticationButtonComponent if you wanted.
You can build declarative interfaces. Using AuthenticationButton, you can add login and logout functionality to the NavBarComponent, for example, without thinking about the implementation details of how the authentication switch works.
🛠 With that in mind, create an AuthNavComponent under the src/components/ directory:
ng g c components/auth-nav --inlineStyle --skipTests
🛠 Populate the auth-nav.component.html file in the src/app/components/auth-nav/ directory like so:
<!--src/app/components/auth-nav/auth-nav.component.html-->

<div class="navbar-nav ml-auto">
  <app-authentication-button></app-authentication-button>
</div>
🛠 Finally, open the nav-bar.component.html template file in the src/app/components/nav-bar/ directory and update it as follows:
<!--src/app/components/nav-bar/nav-bar.component.html-->

<div class="nav-container mb-3">
  <nav class="navbar navbar-expand-md navbar-light bg-light">
    <div class="container">
      <div class="navbar-brand logo"></div>
      <app-main-nav></app-main-nav>
      <app-auth-nav></app-auth-nav>
    </div>
  </nav>
</div>
By having different types of navigation sub-components, you can extend each navigation bar as you need without reopening and modifying the MainNavComponent.
🛠 Go ahead and try to log in. Your Angular application redirects you to the Auth0 Universal Login page. You can use a form to log in with a username and password or a social identity provider like Google. Notice that this login page also gives you the option to sign up.
Experiment: Use SignupButtonComponent
Swap the LoginButtonComponent with the SignupButtonComponent component in the AuthenticationButtonComponent template.
When you click the "Sign Up" button, you'll land in a page with language optimized to encourage you to sign up for your Angular application.
Try this out!
Once you complete this experiment, swap back SignupButtonComponent with LoginButtonComponent to continue with the rest of this guide.
You can customize the appearance of New Universal Login pages. You can also override any text in the New Experience using the Text Customization API.
Notice that when you finish logging in and Auth0 redirects you to your Angular app, the user interface has a blank screen flashing.
The user interface flashes because your Angular app is loading up its services. While it is loading, Angular doesn't know if Auth0 has authenticated the user yet. Your app will know the user authentication status after the Auth0 Angular SDK loads.
🛠 To fix that UI flashing, use the auth.isLoading$ Observable exposed by the AuthService that emits a boolean value to render AppComponent once the Angular SDK has finished loading.
🛠 Open src/app/app.component.ts and update it as follows:
// src/app/app.component.ts

import { Component } from '@angular/core';

import { AuthService } from '@auth0/auth0-angular';

@Component({
  selector: 'app-root',
  templateUrl: './app.component.html',
})
export class AppComponent {
  constructor(public auth: AuthService) {}
}
🛠 Open src/app/app.component.html and update like so:
<!--src/app/app.component.html-->

<div id="app" class="d-flex flex-column h-100">
  <div class="container" *ngIf="auth.isLoading$ | async; else loaded">
    <app-loading></app-loading>
  </div>

  <ng-template #loaded>
    <app-nav-bar></app-nav-bar>

    <div class="container flex-grow-1">
      <div class="mt-5">
        <router-outlet></router-outlet>
      </div>
    </div>

    <app-footer></app-footer>
  </ng-template>
</div>
While the SDK is loading, LoadingComponent renders, which has a cool animation.
Retrieving User Information
After a user successfully logs in, Auth0 sends an ID token to your Angular application. Authentication systems, such as Auth0, use ID Tokens in token-based authentication to cache user profile information and provide it to a client application. The caching of ID tokens can contribute to improvements in performance and responsiveness for your Angular application.
You can use the data from the ID token to personalize the user interface of your Angular application. The Auth0 Angular SDK decodes the ID token and emits its data through the auth.user$ Observable exposed by AuthService. Some of the ID token information includes the name, nickname, picture, and email of the logged-in user.
How can you use the ID token to create a profile page for your users?
🛠 Update ProfileComponent in src/app/pages/profile/profile.component.ts as follows:
// src/app/pages/profile/profile.component.ts

import { Component, OnInit } from '@angular/core';
import { AuthService } from '@auth0/auth0-angular';

@Component({
  selector: 'app-profile',
  templateUrl: './profile.component.html',
})
export class ProfileComponent implements OnInit {
  profileJson: string = null;

  constructor(public auth: AuthService) {}

  ngOnInit(): void {
    this.auth.user$.subscribe(
      (profile) => (this.profileJson = JSON.stringify(profile, null, 2)),
    );
  }
}
🛠 Update the template of ProfileComponent in src/app/pages/profile/profile.component.html as follows:
<!--src/app/pages/profile/profile.component.html-->

<div *ngIf="auth.user$ | async as user">
  <div class="row align-items-center profile-header">
    <div class="col-md-2 mb-3">
      <img
        [src]="user.picture"
        alt="User's profile picture"
        class="rounded-circle img-fluid profile-picture"
      />
    </div>
    <div class="col-md text-center text-md-left">
      <h2>{{ user.name }}</h2>
      <p class="lead text-muted">{{ user.email }}</p>
    </div>
  </div>

  <div class="row" *ngIf="profileJson">
    <pre class="col-12 text-light bg-dark p-4">{{ profileJson }}</pre>
  </div>
</div>
What's happening within the ProfileComponent component?
ngOnInit() is the best place to initialize data for an Angular component. As such, you subscribe to the this.auth.user$ Observable within ProfileComponent. Once this.auth.user$ emits the user profile object, you use JSON.stringify to format the object and assign it to this.profileJson. In turn, you use the *ngIf directive to render a code box with the user profile JSON object based on the value of profileJson.
ProfileComponent renders user information that you could consider protected. Additionally, the user property is null if there is no logged-in user. So either way, this component should only render if Auth0 has authenticated the user.
As such, you should protect the route that renders this component, http://localhost:4040/profile. You'll learn how to do just that in the next section.
Protecting Routes
From all the sections in this guide, this one is the easiest to implement thanks to the robustness of the Angular Router. The Auth0 Angular SDK exposes an AuthGuard that you can use to protect routes.
🛠 Open src/app/app-routing.module.ts and update it as follows:
// src/app/app-routing.module.ts

import { NgModule } from '@angular/core';
import { Routes, RouterModule } from '@angular/router';
import { HomeComponent } from 'src/app/pages/home/home.component';
import { ProfileComponent } from 'src/app/pages/profile/profile.component';
import { ExternalApiComponent } from 'src/app/pages/external-api/external-api.component';

import { AuthGuard } from '@auth0/auth0-angular';

const routes: Routes = [
  {
    path: '',
    component: HomeComponent,
    pathMatch: 'full',
  },
  {
    path: 'profile',
    component: ProfileComponent,
    canActivate: [AuthGuard],
  },
  {
    path: 'external-api',
    component: ExternalApiComponent,
    canActivate: [AuthGuard],
  },
];

@NgModule({
  imports: [RouterModule.forRoot(routes)],
  exports: [RouterModule],
})
export class AppRoutingModule {}
Requiring user login to access a route is easy: just include the canActivate property in the route definition and add AuthGuard as its value. When users who have not logged in visit that route, your Angular application will redirect them to the login page. After the user logs in, Auth0 will redirect the user to your Angular application, and the AuthService will take the users to the page they intended to access before login.
🛠 You can now test that these two paths, /profile and /external-api, require users to authenticate before they can access them. Log out and try to access the Profile or External API tab. If it works, Angular redirects you to log in with Auth0.
Client-side guards improve the user experience of your Angular application, not its security.
In Security StackExchange, Conor Mancone explains that server-side guards are about protecting data while client-side guards are about improving user experience.
The main takeaways from his response are:
- You can't rely on client-side restrictions, such as navigation guards and protected routes, to protect sensitive information.
- Attackers can potentially get around client-side restrictions.
- Your server should not return any data that a user should not access.
- Returning all the user data from the server and letting the front-end framework decide what to display and what to hide based on the user authentication status is the wrong approach.
- Anyone can open the browser's developer tools and inspect the network requests to view all the data.
- The use of navigation guards helps improve user experience, not user security. - Without guards, a user who has not logged in may wander into a page with restricted information and see an error, like "Access Denied". - With guards that match the server permissions, you can prevent users from seeing errors by preventing them from visiting the restricted page.
Calling an API
This section focuses on showing you how to get an access token in your Angular application and how to use it to make API calls to protected API endpoints.
When you use Auth0, you delegate the authentication process to a centralized service. Auth0 provides you with functionality to log in and log out users from your Angular application. However, your application may need to access protected resources from an API.
You can also protect an API with Auth0. Auth0 offers multiple Auth0 API quickstarts to help you integrate Auth0 with your backend platform.
When you use Auth0 to protect your API, you also delegate the authorization process to a centralized service that ensures only approved client applications can access protected resources on behalf of a user.
How can you make secure API calls from Angular?
Your Angular application authenticates the user and receives an access token from Auth0. The application can then pass that access token to your API as a credential. In turn, your API can use Auth0 libraries to verify the access token it receives from the calling application and issue a response with the desired data.
Instead of creating an API from scratch to test the authentication and authorization flows between the client and the server, you'll use a demo Express API that I've prepared for you.
Get the Express API demo
🛠 Open a new terminal window and clone the auth0-express-js-sample repo somewhere in your system. Ensure that you clone it outside your Angular project directory.
git clone git@github.com:auth0-blog/auth0-express-js-sample.git
🛠 Once you clone this repo, make the auth0-express-js-sample directory your current directory:
cd auth0-express-js-sample
🛠 Install the Node.js project dependencies:
npm install
Connect the Express API with Auth0
Create a communication bridge between Express and Auth0
This process is similar to how you connected Angular with Auth0.
🛠 Head to the APIs section in the Auth0 Dashboard, and click the "Create API" button.
🛠 Then, in the form that Auth0 shows:
- Add a Name to your API:
Auth0 Express Sample
- Set its Identifier value:
https://express.sample
- Leave the signing algorithm as
RS256as it's the best option from a security standpoint.
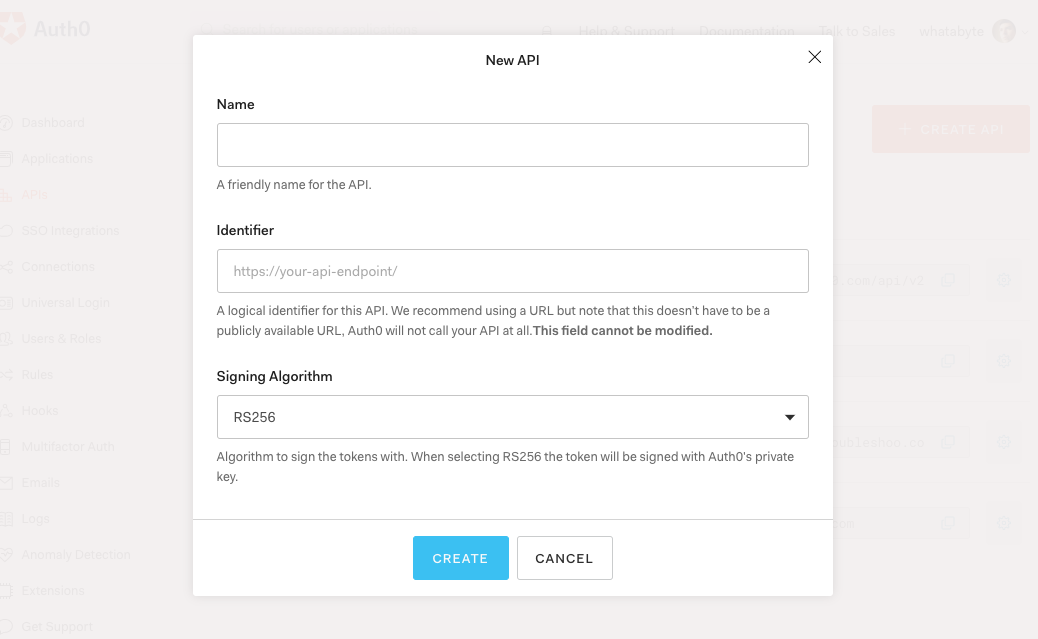
Identifiers are unique strings that help Auth0 differentiate between your different APIs. We recommend using URLs to facilitate creating unique identifiers predictably; however, Auth0 never calls these URLs.
🛠 With these values in place, hit the "Create" button. Keep this page open as you'll need some of its values in the next section.
Add the Auth0 configuration variables to Express
🛠 Create a .env file for the API Server under the auth0-express-js-sample directory:
touch .env
🛠 Populate this auth0-express-js-sample/.env file as follows:
SERVER_PORT=6060
CLIENT_ORIGIN_URL=http://localhost:4040
AUTH0_AUDIENCE=
AUTH0_DOMAIN=
🛠 Head back to your Auth0 API page, and follow these steps to get the Auth0 Audience:
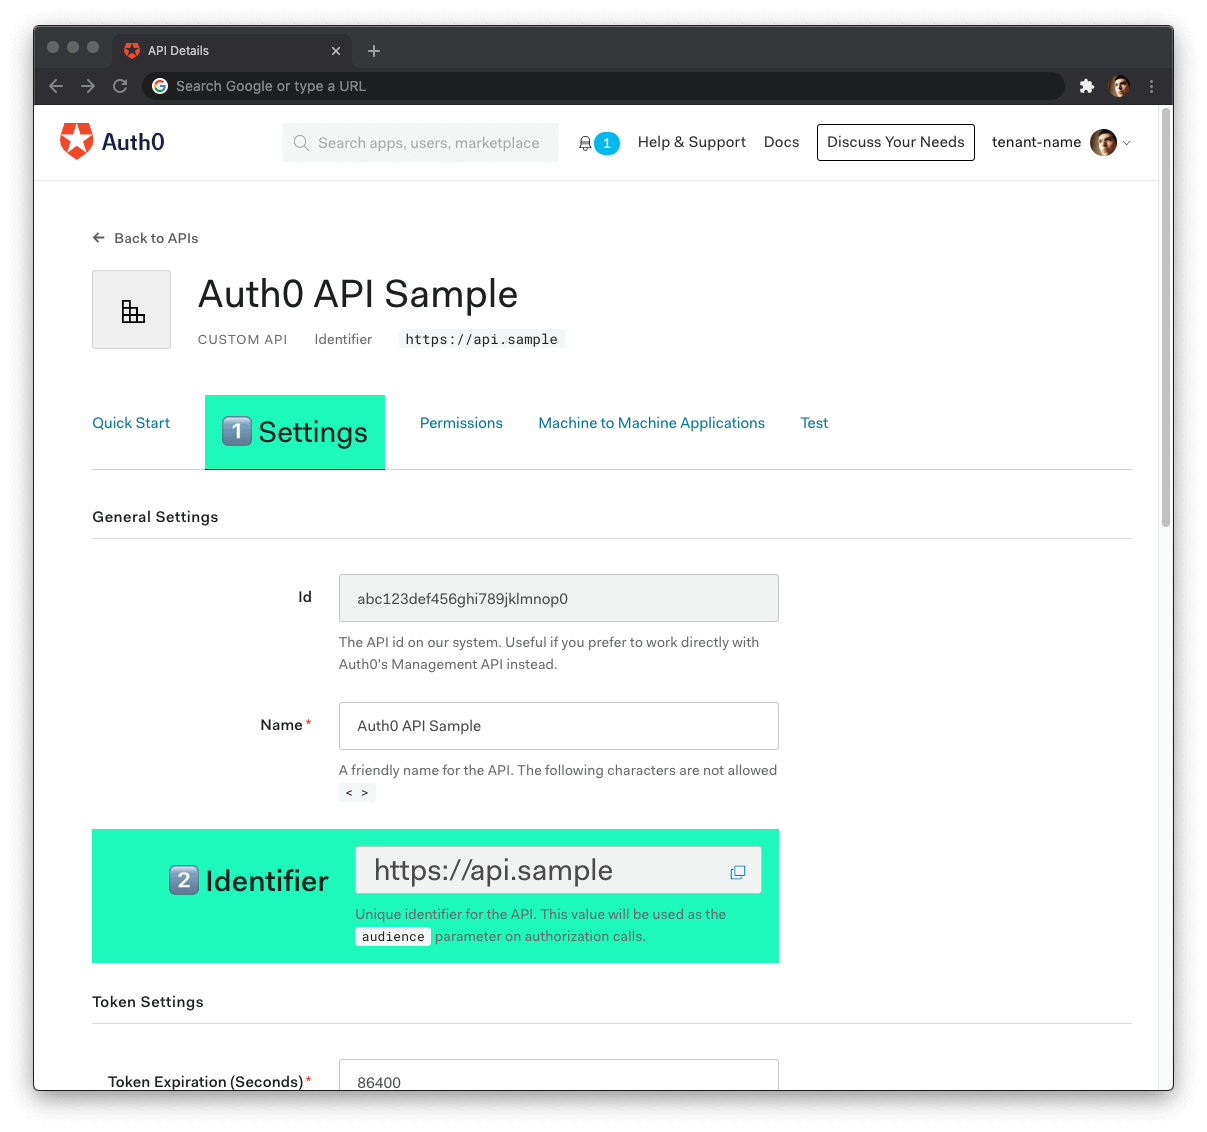
🛠 Click on the "Settings" tab.
🛠 Locate the "Identifier" field and copy its value.
🛠 Paste the "Identifier" value as the value of
AUTH0_AUDIENCEin.env.
Now, follow these steps to get the Auth0 Domain value:
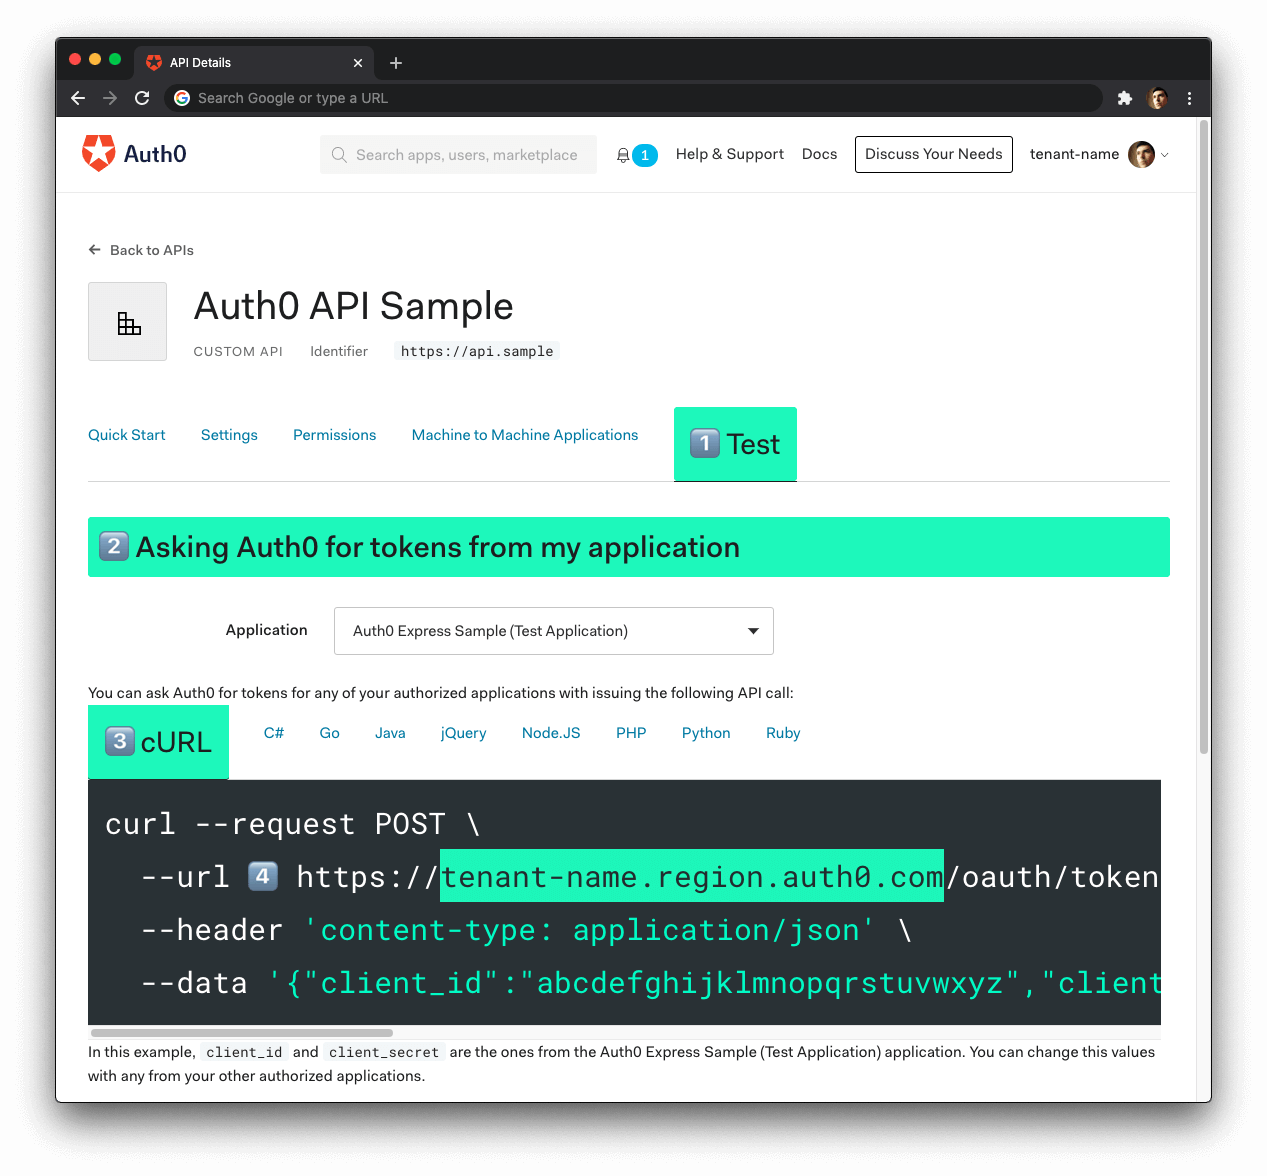
- 🛠 Click on the "Test" tab.
- 🛠 Locate the section called "Asking Auth0 for tokens from my application".
- 🛠 Click on the cURL tab to show a mock
POSTrequest. - 🛠 Copy your Auth0 domain, which is part of the
--urlparameter value:tenant-name.region.auth0.com. - 🛠 Paste the Auth0 domain value as the value of
AUTH0_DOMAINin.env.
Tips to get the Auth0 Domain
The Auth0 Domain is the substring between the protocol,
https://and the path/oauth/token.The Auth0 Domain follows this pattern:
tenant-name.region.auth0.com.The
regionsubdomain (au,us, oreu) is optional. Some Auth0 Domains don't have it.Click on the image above, please, if you have any doubt on how to get the Auth0 Domain value.
🛠 With the .env configuration values set, run the API server by issuing the following command:
npm start
Configure Angular to connect with the Express API
🛠 Head back to the auth0-angular-sample project directory that stores your Angular application.
🛠 Locate the auth_config.json file and add an audience and a server URL value to it:
{
  "domain": "YOUR_AUTH0_DOMAIN",
  "clientId": "YOUR_AUTH0_CLIENT_ID",
  "audience": "https://express.sample",
  "serverUrl": "http://localhost:6060"
}
🛠 The value of audience is the same as AUTH0_AUDIENCE from auth0-express-js-sample/.env.
🛠 Locate the src/environments/environment.ts file and update it as follows:
// src/environments/environment.ts

import { domain, clientId, audience, serverUrl } from '../../auth_config.json';

export const environment = {
  production: false,
  auth: {
    domain,
    clientId,
    redirectUri: window.location.origin,
    audience,
  },
  dev: {
    serverUrl,
  },
};
Your Angular application needs to pass an access token when it calls a target API to access protected resources.
The Auth0 Angular SDK provides an HttpInjector that automatically attaches access tokens to outgoing requests when using the built-in Angular HttpClient module. However, you must configure the injector to know to which requests it needs to attach access tokens.
🛠 Start by importing the HTTP_INTERCEPTORS token and the AuthHttpInterceptor right above the @NgModule definition in the src/app/app.module.ts file:
// src/app/app.module.ts

// Other imports...

import { HTTP_INTERCEPTORS } from '@angular/common/http';
import { AuthHttpInterceptor } from '@auth0/auth0-angular';

@NgModule({...})
export class AppModule {}
You are importing AuthHttpInterceptor from @auth0/auth0-angular along with HTTP_INTERCEPTORS from @angular/common/http. HTTP_INTERCEPTORS is a multi-provider token that represents the array of registered HttpInterceptor objects.
🛠 Next, add the providers property to the configuration object of AppModule as follows to register the AuthHttpInterceptor injector as a provider:
// src/app/app.module.ts

// All imports...

@NgModule({
  declarations: [...],
  imports: [...],
  providers: [
    {
      provide: HTTP_INTERCEPTORS,
      useClass: AuthHttpInterceptor,
      multi: true,
    },
  ],
  bootstrap: [AppComponent],
})
export class AppModule {}
This completes the wiring needed to connect the AuthHttpInterceptor with your Angular application request cycle.
Now, you need to tell the SDK to which requests to attach access tokens by further configuring AuthModule.forRoot(). Based on that configuration, Angular will match the URL of any request that you make using HttpClient against an allowed list of URLs.
If there's a match, Angular attaches an access token to the authorization header of the request. You can use a string or a regular expression for the URL matching. For now, you are going to allow Angular to attach an access token to requests it makes to http://localhost:6060/api/messages/protected-message.
🛠 Update the configuration of the AuthModule present in the module imports of AppModule as follows:
// src/app/app.module.ts

// All imports...

@NgModule({
  declarations: [...],
  imports: [
    BrowserModule,
    AppRoutingModule,
    HttpClientModule,
    FontAwesomeModule,
    // 👇 update AuthModule
    AuthModule.forRoot({
      ...env.auth,
      httpInterceptor: {
        allowedList: [`${env.dev.serverUrl}/api/messages/protected-message`],
      },
    }),
  ],
  providers: [...],
  bootstrap: [...],
})
export class AppModule {}
Suppose you make an HTTP call using HttpClient and there is no match for that URL in the AuthHttpInterceptor. In that case, Angular bypasses the interceptor and makes the call without a token attached in the Authorization header.
Note: Being explicit about which API requests require an access token in the authorization header prevents your tokens from being attached to requests made to an unintended recipient, which is a serious security issue. Those recipients could then use that token to call the API as if it were your application.
Finally, make your API call using the HttpClient, which is available as HttpClientModule was already imported in the starter project.
🛠 Update src/app/pages/external-api/external-api.component.ts as follows:
// src/app/pages/external-api/external-api.component.ts

import { Component, OnInit } from '@angular/core';
import { HttpClient } from '@angular/common/http';

import { environment as env } from '../../../environments/environment';

interface Message {
  message: string;
}

@Component({
  selector: 'app-external-api',
  templateUrl: './external-api.component.html',
})
export class ExternalApiComponent implements OnInit {
  message: string = null;

  constructor(private http: HttpClient) {}

  ngOnInit(): void {}

  callApi(): void {
    this.http
      .get(`${env.dev.serverUrl}/api/messages/public-message`)
      .subscribe((result: Message) => {
        this.message = result.message;
      });
  }

  callSecureApi(): void {
    this.http
      .get(`${env.dev.serverUrl}/api/messages/protected-message`)
      .subscribe((result: Message) => {
        this.message = result.message;
      });
  }
}
⚠️ Check that the URL you're calling using HttpClient matches the rule you've got in your httpInterceptor configuration. Watch out for trailing slashes.
🛠 Update src/app/pages/external-api/external-api.component.html as follows:
<!--src/app/pages/external-api/external-api.component.html-->

<div>
  <h1>External API</h1>
  <p>
    Use these buttons to call an external API. The protected API call has an
    access token in its authorization header. The API server will validate the
    access token using the Auth0 Audience value.
  </p>
  <div
    class="btn-group mt-5"
    role="group"
    aria-label="External API Requests Examples"
  >
    <button (click)="callApi()" type="button" class="btn btn-primary">
      Get Public Message
    </button>
    <button (click)="callSecureApi()" type="button" class="btn btn-primary">
      Get Protected Message
    </button>
  </div>

  <div *ngIf="message" class="mt-5">
    <h6 class="muted">Result</h6>
    <div class="container-fluid">
      <div class="row">
        <code class="col-12 text-light bg-dark p-4"> {{ message }} </code>
      </div>
    </div>
  </div>
</div>
What is happening now within the ExternalApi component?
You add a callApi() method that performs a public API request and a callSecureApi() method that performs a secure API request. The implementation of each method looks the same. However, under the hood, Angular finds a match for ${env.dev.apiUrl}/api/messages/protected-message in the allowedList of the AuthHttpInterceptor.
Then, Angular uses the Auth0 SDK to get an access token from Auth0 and attaches that access token as a bearer credential in the authorization header of the request.
You then assign the result of the successful request to this.message, which you render in the user interface using a code box.
Why is the Auth0 Audience value the same for both client and server applications?
Auth0 uses the value of the audience property to determine which resource server (API) the user is authorizing your Angular application to access.
The actions that your Angular application can perform on the API depend on the scopes that your access token contains. You can define the value of the scope in the tokenOptions of an httpInterceptor.allowedList entry.
Remember that screen you saw when you first logged in with Auth0 asking you for permission to access your profile information? Your Angular application will request authorization from the user to access the requested scopes, and the user will approve or deny the request. That screen is known as the consent dialog. You may have seen this before when using GitHub, Google, or Facebook to log in or when sharing your email contacts with a third party.
When you don't pass a scope property to tokenOptions, the Angular SDK defaults to the OpenID Connect Scopes: openid profile email.
openid: This scope informs the Auth0 Authorization Server that the client is making an OpenID Connect (OIDC) request to verify the user's identity. OpenID Connect is an authentication protocol.profile: This scope value requests access to the user's default profile information, such asname,nickname, andpicture.email: This scope value requests access to theemailandemail_verifiedinformation.
The details of the OpenID Connect Scopes go into the ID Token.
In the case of your APIs, you'll define custom API scopes to implement access control, and you'll identify them in the calls that your client applications make to that API. Auth0 includes API scopes in the access token as the scope claim.
The concepts about API scopes or permissions are better covered in an Auth0 API tutorial such as "Use TypeScript to Create a Secure API with Node.js and Express: Role-Based Access Control".
Your previous login request did not include an audience parameter. As such, the Angular SDK doesn't have an access token stored in memory.
You should not store tokens in localStorage. Why?
Storing tokens in browser local storage provides persistence across page refreshes and browser tabs. However, if an attacker can run JavaScript in the Single-Page Application (SPA) using a cross-site scripting (XSS) attack, they can retrieve the tokens stored in local storage.
A vulnerability leading to a successful XSS attack can be either in the SPA source code or in any third-party JavaScript code included in the SPA, such as Bootstrap, jQuery, or Google Analytics.
🛠 Log out and log back in to get a new access token from Auth0 that includes the audience information.
🛠 Visit http://localhost:4040/external-api and click any of the buttons on the External API page to test the responses.
Get Public Message:
The API doesn't require an access token to share this message.
Get Protected Message:
The API successfully validated your access token.
Conclusion
You have implemented user authentication in Angular to identify your users, get user profile information, and control the content that your users can access. You also learned how to make secure API calls between a client and a server of a stack protected with Auth0.
This tutorial covered the most common authentication use case for a Angular application: simple login and logout. However, Auth0 is an extensible and flexible platform that can help you achieve even more. If you have a more complex use case, check out the Auth0 Architecture Scenarios to learn more about the typical architecture scenarios we have identified when working with customers on implementing Auth0.
In a follow-up guide, we'll cover advanced authentication patterns and tooling, such as using a pop-up instead of a redirect to log in users, adding permissions to ID tokens, using metadata to enhance user profiles, and much more.
Let me know in the comments below how you liked this tutorial. Thank you for reading this post and stay tuned for more, please.
About the author

Dan Arias
Software Engineer (Auth0 Alumni)