
Are you starting from this chapter?
Clone the application repo and check out the creating-endpoints-data-validation branch:
git clone git@github.com:auth0-blog/wab-menu-api-nestjs.git \
nest-restaurant-api \
--branch creating-endpoints-data-validation
Make the project folder your current directory:
cd nest-restaurant-api
Then, install the project dependencies:
npm i
Finally, create a .env hidden file:
touch .env
Populate .env with this:
PORT=7000
So far, you've built an API that allows anyone to read and write data. However, one of the security requirements of this API is that only a selected number of users can write records to the store. To restrict access to API endpoints, you need to implement authorization.
Which Comes First: The Authorization Chicken or the Authentication Egg?
Your API needs to determine what users can and cannot access with each request. This process is known as authorization. There's a bit of a catch here. For you to know what a user can do, you first need to know who that user is. This process is known as authentication. For example, a user identified as an admin would have access to endpoints that write data while a user identified as a customer wouldn't.
Web applications commonly perform authentication by asking users to provide a set of credentials to log in through a client application, like a ReactJS interface. The client application sends the credentials to an authentication server that validates them. Upon success, the authentication server can share information about the identity and access of the user with the web application. To implement these Identity and Access Management (IAM) tasks easily, developers can use OAuth, an authorization framework, and OpenID Connect (OIDC), a simple identity layer on top of OAuth.
OAuth encapsulates access information in something called an access token. In turn, OpenID Connect encapsulates identity information in something called an ID token. The authentication server can send these two tokens to the client application that initiated the authentication process. When the user needs to make a request to a protected API endpoint, the client application must send the access token with the request for the API to then carry out the authorization process.
As such, in this architecture model, authentication starts on the client-side, while authorization starts on the server-side. Since the scope of this tutorial is to build a secure NestJS API, your main focus is to implement authorization. But, you will have access to a demo client application that you can use to authenticate a user, get an access token, and issue API requests to provide you with a realistic flow of identity management.
You won't have to worry about implementing OAuth and OpenID Connect or building an authentication server. Instead, you'll delegate that job to Auth0.
Set Up API Authorization
With Auth0, you can manage the authorization requirements of this application-to-server architecture easily. To start, you need to create a free Auth0 account if you don't have one yet.
Auth0 is a flexible, drop-in solution to add authentication and authorization services to your applications. Your team and organization can avoid the cost, time, and risk that comes with building your own solution to authenticate and authorize users. We offer tons of guidance and SDKs for you to get started and integrate Auth0 in your stack easily.
After you create your account, you'll create an Auth Tenant, which is a container that Auth0 uses to store your identity service configuration and your users in isolation — no other Auth0 customer can peek into or access your tenant. It's similar to you being a tenant in an apartment building. Auth0 looks after the building while the apartment is all yours to live in and customize. However, each apartment is fully isolated (no windows, soundproof walls, etc.) so that neighbors can't intrude on your privacy.
After creating your tenant, you need to create an Auth0 API, which is an API that you define within your Auth0 tenant and that you can consume from your applications to process authentication and authorization requests.
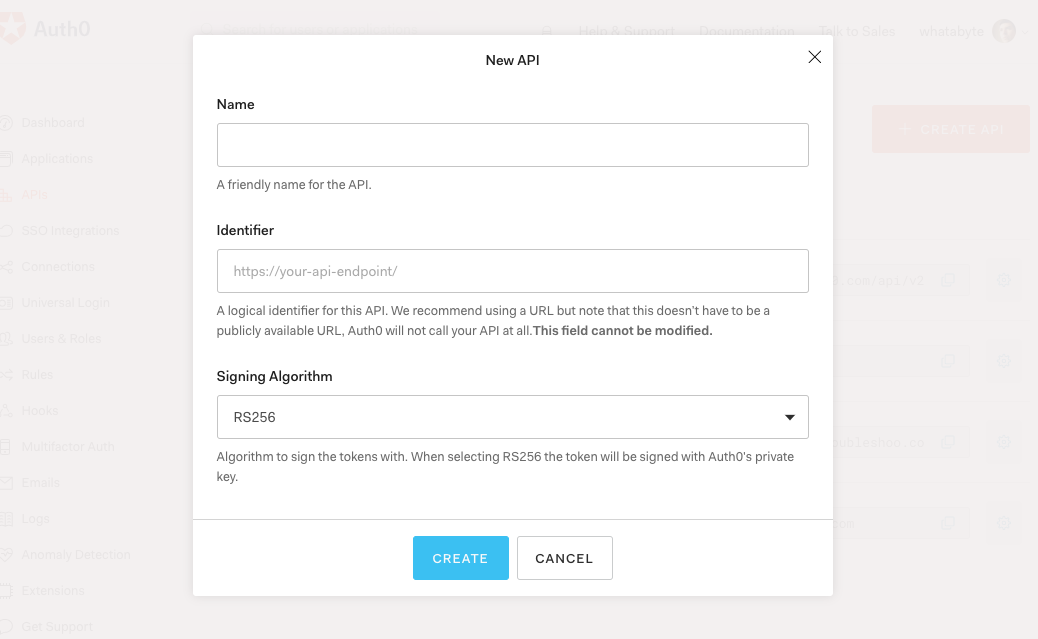
Head to the APIs section of the Auth0 Dashboard and hit the Create API button.
Then, in the form that comes up:
- Add a Name to your API:
Menu API
- Set the Identifier:
https://menu-api.demo.com
- Leave the signing algorithm as
RS256. It's the best option from a security standpoint.
As you may have more than one API that requires authorization services, you can create as many Auth0 APIs as you need. As such, the identifier is a unique string that Auth0 uses to differentiate between your Auth0 APIs. We recommend structuring the value of identifiers as URLs to make it easy to create unique identifiers predictably. Bear in mind that Auth0 never calls these URLs.
Once you've added those values, hit the Create button.
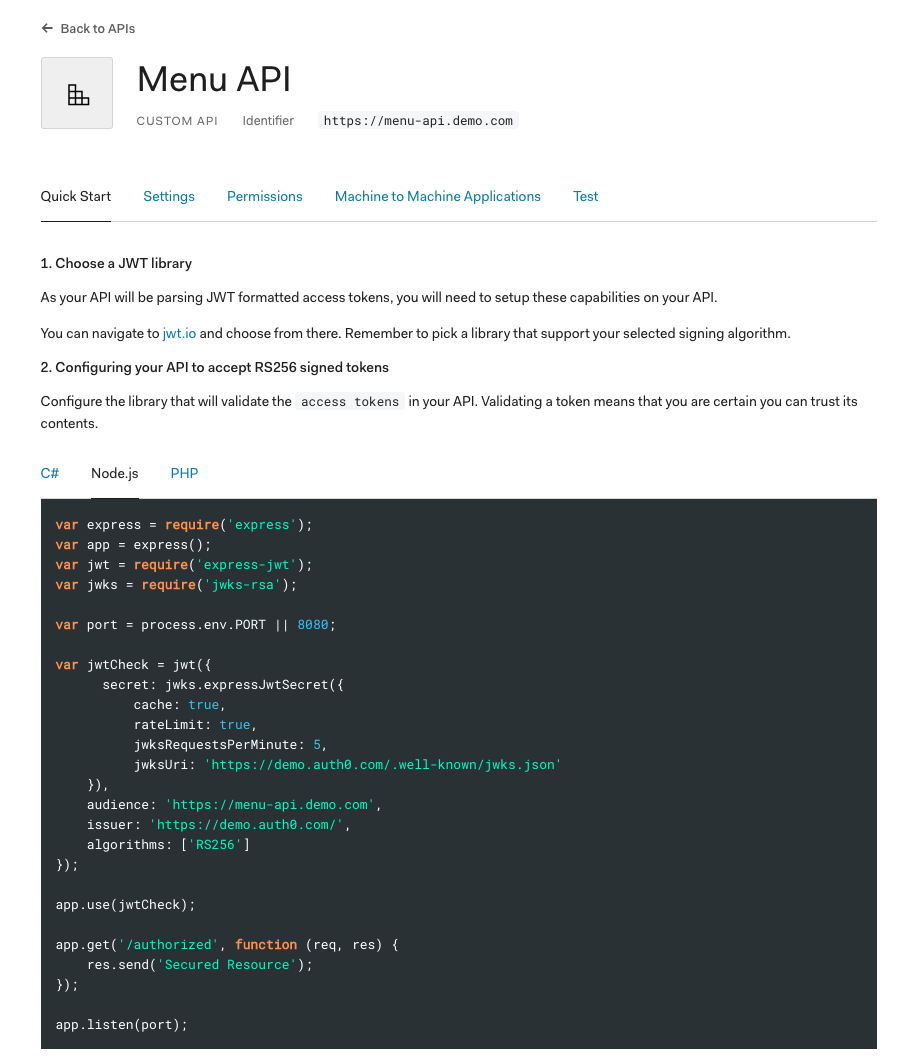
A new page loads and presents you with your Auth0 API information. Click on the Quick Start tab. This page offers guidance on how to set up different backend technologies to consume the Authorization API you've created. From the code box, choose Node.js.
To configure Passport in the next sections, you'll need two values from Auth0: an Auth0 Issuer URL and an Auth0 Audience. You'll store these values in your .env file. Update .env like so using the values from the Node.js code snippet under the Quick Start tab:
PORT=7000
AUTH0_ISSUER_URL=https://<AUTH0-TENANT-NAME>.auth0.com/
AUTH0_AUDIENCE=https://menu-api.demo.com
The AUTH0_ISSUER_URL is the value of the issuer property and the AUTH0_AUDIENCE is the value of the audience property, which is the same as the identifier that you created earlier.
Create an Authorization Module
Auth0 will manage users and credentials for you. To run the authorization process within the boundaries of NestJS, you'll use Passport. Although Passport is a Node.js authentication library, NestJS offers a Passport utility module that makes it easy to integrate Passport in your application and use some of its available methods to carry out the authorization process.
As an alternative, you can use a NestJS middleware function with
express-jwtto perform the authorization step.
As explained in the introduction, the Identity and Access Management (IAM) flow for this application architecture is as follows:
Users will start by authenticating with a username and password managed by Auth0.
Once authenticated, the Auth0 authentication server issues a JWT (JSON Web Token) to the client called an access token.
The access token has information on what the client application can do in your API on behalf of an authenticated user: it represents authorization to access data. As such, the client application must include the access token in the authorization header of every request it makes to protected endpoints.
⚠️ While the access token is a byproduct of the authentication process, it does not prove user identity or authentication. It's crucial to secure the access token properly as anyone holding the token can use it to access the APIs, which is why it's also known as a bearer token.
- The server validates the access token. If valid, the server determines if the token bearer can access the requested endpoint using information within the token.
To put authorization in effect, you will create guards to protect endpoints that write to the store. These guards will reject any request that doesn't contain a valid access token. You will bundle all of your authorization logic in a module named AuthzModule.
As before, use the NestJS CLI to create your new authorization module:
nest generate module authz
Just like that, NestJS creates an authz directory under the src directory and places an authz.module.ts file within it that defines the basic structure for AuthzModule. If you inspect the AppModule definition, you'll see that NestJS has added AuthzModule to its imports array, which exposes the functionality of AuthzModule throughout your application:
// src/app.module.ts

import { Module } from '@nestjs/common';
import { ItemsModule } from './items/items.module';
import { AuthzModule } from './auth/authz.module';

@Module({
  imports: [ItemsModule, AuthzModule],
  controllers: [],
  providers: [],
})
export class AppModule {}
You are now ready to set up Passport and get Auth0 to work for you!
Use Passport with NestJS
Passport.js offers different authentication mechanisms, known as Strategies, to cater to the unique authentication requirements each application has. Passport packages Strategies as individual modules, and you can choose which Strategies to employ, without creating unnecessary dependencies. The @nestjs/passport module wraps these strategies into idiomatic NestJS constructs.
For your application, you'll create a JSON Web Token (JWT) Passport Strategy that you'll bundle within AuthzModule. To start, install the following dependencies:
npm i passport @nestjs/passport passport-jwt jwks-rsa
Here's a breakdown of what these packages do:
passport: Express-compatible authentication middleware for Node.js.@nestjs/passport: The Passport utility module for Nest.passport-jwt: Passport Strategy for authenticating with a JSON Web Token (JWT).jwks-rsa: A library to retrieve RSA signing keys from a JWKS (JSON Web Key Set) endpoint.
In reality, Passport acts more like an authentication framework than a library. It abstracts the authentication process into a series of standard steps that are customized based on the Strategy that you are implementing. You can use some of these steps to perform authorization tasks such as validating the access token and attaching its information into the Request object.
These are the key elements of Passport that apply to the authorization process:
Configuration options for the Strategy.
A verify callback, which has the purpose of finding the user that possesses a set of credentials. When Passport validates a request, it parses the credentials or any other identity-related information contained in the request. It then invokes the verify callback with the authentication data as arguments, such as an access token, that your application can then consume.
Let's see this in action.
To configure a JwtStrategy Passport Strategy, you need two values from your .env file that you'll load using dotenv.config() when the Strategy initializes: AUTH0_ISSUER_URL and AUTH0_AUDIENCE.
Next, create a jwt.strategy.ts file under the src/authz directory:
touch src/authz/jwt.strategy.ts
Update this file as follows:
// src/authz/jwt.strategy.ts

import { Injectable } from '@nestjs/common';
import { PassportStrategy } from '@nestjs/passport';
import { ExtractJwt, Strategy } from 'passport-jwt';
import { passportJwtSecret } from 'jwks-rsa';
import * as dotenv from 'dotenv';

dotenv.config();

@Injectable()
export class JwtStrategy extends PassportStrategy(Strategy) {
  constructor() {
    super({
      secretOrKeyProvider: passportJwtSecret({
        cache: true,
        rateLimit: true,
        jwksRequestsPerMinute: 5,
        jwksUri: `${process.env.AUTH0_ISSUER_URL}.well-known/jwks.json`,
      }),

      jwtFromRequest: ExtractJwt.fromAuthHeaderAsBearerToken(),
      audience: process.env.AUTH0_AUDIENCE,
      issuer: `${process.env.AUTH0_ISSUER_URL}`,
      algorithms: ['RS256'],
    });
  }

  validate(payload: unknown): unknown {
    return payload;
  }
}
You can create a Passport Strategy by extending the abstract class returned by the PassportStrategy function from the @nestjs/passport module. This function takes as argument the Strategy that you want to implement, which in this case is the JWT Strategy imported from passport-jwt.
The Strategy options passed through the super() call within the constructor let you parse JWT-formatted access tokens and configure your API to accept RS256 signed tokens.
With the NestJS wrapper applied, the verify callback becomes the validate() method. In this case, the implementation of validate() is straightforward because Auth0 handles all of the user authentication tasks for you in your tenant. By the time your application calls validate(), Auth0 has already determined the identity of the logged-in user and passes data about that user within the payload object. Your application then attaches the payload to the request object, which you can access throughout the request-response cycle through controllers and middleware.
The next step is to configure Passport with JwtStrategy and to register it with AuthzModule. Open src/authz/authz.module.ts and update it as follows:
import { Module } from '@nestjs/common';
import { PassportModule } from '@nestjs/passport';
import { JwtStrategy } from './jwt.strategy';

@Module({
  imports: [PassportModule.register({ defaultStrategy: 'jwt' })],
  providers: [JwtStrategy],
  exports: [PassportModule],
})
export class AuthzModule {}
You import the PassportModule, which is a NestJS wrapper on Passport, and register jwt as its default Strategy.
You have the mechanics in place to receive an access token and verify if the request is authorized or not. The next step is to create guards that will block unauthorized requests to protected endpoints using the @UseGuards() decorator.
Create Endpoint Guards with NestJS
Update src/items/items.controller.ts as follows:
import {
  Body,
  Controller,
  Delete,
  Get,
  Param,
  Post,
  Put,
  UseGuards,
} from '@nestjs/common';
import { ItemsService } from './items.service';
import { Items } from '../items';
import { Item } from '../item';
import { AuthGuard } from '@nestjs/passport';

@Controller('items')
export class ItemsController {
  constructor(private readonly itemsService: ItemsService) {}

  @Get()
  async findAll(): Promise<Items> {
    return this.itemsService.findAll();
  }

  @Get(':id')
  async find(@Param('id') id: number): Promise<Item> {
    return this.itemsService.find(id);
  }

  @UseGuards(AuthGuard('jwt'))
  @Post()
  async create(@Body('item') item: Item): Promise<void> {
    this.itemsService.create(item);
  }

  @UseGuards(AuthGuard('jwt'))
  @Put()
  async update(@Body('item') item: Item): Promise<void> {
    this.itemsService.update(item);
  }

  @UseGuards(AuthGuard('jwt'))
  @Delete(':id')
  async delete(@Param('id') id: number): Promise<void> {
    this.itemsService.delete(id);
  }
}
Let's look at the POST items/ endpoint:
  @UseGuards(AuthGuard('jwt'))
  @Post()
  async create(@Body('item') item: Item): Promise<void> {
    this.itemsService.create(item);
  }
With @UseGuards(AuthGuard('jwt')), you are using an AuthGuard that @nestjs/passport automatically provisioned for your AuthzModule when you configured the passport-jwt module in your Passport Strategy, JwtStrategy. The @UseGuards() decorator references this guard by its default name, jwt, which matches the value of the defaultStrategy you registered for the PassportModule within the AuthzModule definition.
When you make a request to the POST items/ protected endpoint, the guard automatically invokes your JwtStrategy configuration logic and blocks the request if the access token is not valid or it's absent.
Try it out:
curl -X POST -H 'Content-Type: application/json' -d '{
  "item": {
    "name": "Salad",
    "price": 4.99,
    "description": "Fresh",
    "image": "https://cdn.auth0.com/blog/whatabyte/salad-sm.png"
  }
}' http://localhost:7000/items -i
It won't work. You'll get a 401 Unauthorized response indicating that the server has rejected the request due to not having the authorization required by the target resource, the POST items/ endpoint.
However, making a request to the GET items/ endpoint works:
curl http://localhost:7000/items -i
To test the authentication feature of your application, you'll need a valid access token. A client, such as a Single-Page Application (SPA), would get the access token by performing a login and then passing the access token in an authorization header to your API. You don't have a client built yet, but you can use this Demo Client: WHATABYTE Dashboard.
Register a Client Application with Auth0
WHATABYTE Dashboard is a client application that can consume the API that you have created so far. To use Auth0 to manage the authentication process of a client application, you need to register that client application with Auth0.
Once registered, Auth0 provides you with a Client ID to identify that client application when it interacts with the Auth0 service, such as when it accesses the Auth0 APIs to perform a login transaction or get user-profile information. Auth0 also provides you with a Domain value to use as the base URL to make requests to those Auth0 APIs.
The process of registering a client application with Auth0 is quite easy:
Open the Auth0 Applications section of the Auth0 Dashboard.
Click on the Create Application button.
Provide a Name value such as
WAB Dashboard.Choose Single Page Web Applications as the application type.
Click on the Create button.
All done. A page should load, presenting you with all the configuration options and information about this newly configured client application. Click on the Settings tab to find the Client ID and Domain values.
Now, head to the WAB Dashboard client and enter these two values in the Auth0 Demo Settings form.
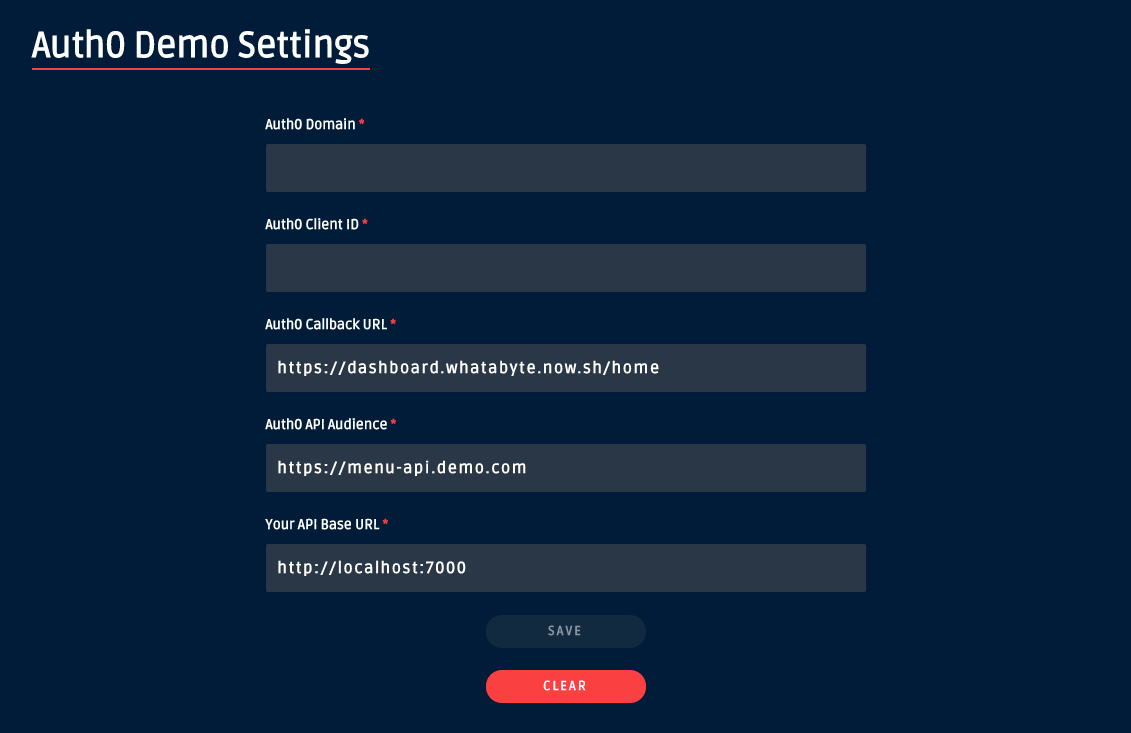
Notice that the Auth0 Demo Settings form has three other values. "Your API Base URL" should map to the domain where your NestJS server is running. The other two, "Auth0 Callback URL" and "Auth0 API Audience", are values that Auth0 also requires for your client application to interact with its authentication service securely.
Verify that these other fields are set to these values:
Auth0 Callback URL
https://dashboard-v1.whatabyte.app/home
API Audience
https://menu-api.demo.com
API URL
http://localhost:7000
For now, click on the "Save" button and then click on the "Settings" tab of the WAB Dashboard to reaccess the configuration values as you'll need them in the next section.
Connect a Client Application With Auth0
Head back to the Settings tab of your Auth0 client application and update the following setting fields:
Allowed Callback URLs
Use the value of Auth0 Callback URL from the Auth0 Demo Settings form:
https://dashboard-v1.whatabyte.app/home
After your users authenticate, Auth0 will only redirect your users to any of the URLs listed here. You can specify multiple valid URLs by comma-separating them (typically to handle different environments like QA or testing). Make sure to specify the protocol, http:// or https://, otherwise the callback may fail in some cases.
Allowed Web Origins
Use the following:
https://dashboard-v1.whatabyte.app
This field holds a comma-separated list of allowed origins for use with web message response mode, which makes it possible to log in using a pop-up, as you'll soon see in the next section.
Allowed Logout URLs
Use the following:
https://dashboard-v1.whatabyte.app/home
This field holds the URLs that Auth0 should use to redirect your users after they log out of your application. The demo client has been configured to use the provided value for redirecting users.
Once these values are in place, scroll to the bottom and click on the Save Changes button.
You are ready to start consuming your NestJS API with this provided demo client.
Enable CORS in NestJS
To test the connection between the client and the server, click on the Menu tab of the WAB Dashboard. You will see the following error:
Network Error. Unable to retrieve menu information.
If you open the browser developer console, you'll notice that a CORS error has occurred. However, fixing this is easy with NestJS.
Open src/main.ts and update it as follows:
// src/main.ts

import { NestFactory } from '@nestjs/core';
import { AppModule } from './app.module';
import * as dotenv from 'dotenv';
import { ValidationPipe } from '@nestjs/common';

dotenv.config();

async function bootstrap() {
  const app = await NestFactory.create(AppModule);

  app.enableCors();
  app.useGlobalPipes(
    new ValidationPipe({
      disableErrorMessages: true,
    }),
  );

  await app.listen(process.env.PORT);
}
bootstrap();
You call the enableCors() method of your app instance to allow another domain to request resources.
Head back to the WAB Dashboard Menu View and refresh it. This time around, the three items available in your NestJS store load up, and the CORS error disappears from the developer console.
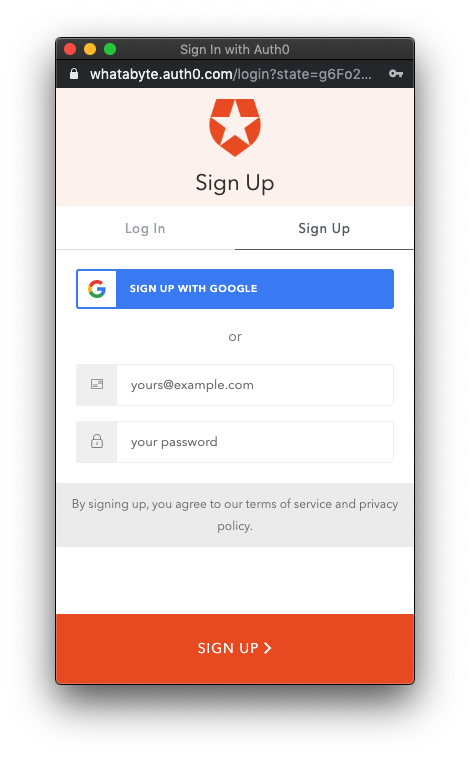
Sign In
In the WAB Dashboard, click on the Sign In button. Since this may be the first user you are adding to Auth0, go ahead and click on the Sign Up tab in the pop-up that comes up and provide an email and password to register your new user.
Once signed in, the user interface changes:
The Sign In button becomes a Sign Out button
A user tab shows up below the Sign Out button.
Click on the User tab, and you'll see a custom page with your email as the title.
The WAB Dashboard caters to two types of users: regular users who can only read data and users with a menu-admin role who can read and write data. This role allows the user to create, update, and delete menu items using the WAB Dashboard.
In the next section, you are going to create the menu-admin role, associate permissions with it, and assign it to a new user that you'll create through the Auth0 Dashboard. This privileged user can unlock the admin features of the WAB Dashboard.
About the author

Dan Arias
Software Engineer (Auth0 Alumni)