


Your app authenticates users through a partner's identity system, but your APIs expect Auth0 tokens. Or maybe you are migrating millions of users from a legacy IdP and cannot force them all to re-authenticate. Or you need support agents to access customer accounts with a proper audit trail.
These scenarios share a common pattern: you have a token from one system and need a token from another. That is what OAuth 2.0 Token Exchange (RFC 8693) was designed for and it is what Custom Token Exchange on Auth0 lets you build.
The key word here is custom. Auth0 handles the heavy lifting (client authentication, user management, token issuance, attack protection) but you write the logic that decides what an incoming token means and whether it should be trusted. You define the trust boundary.
In this post, we'll walk through what Custom Token Exchange (CTE) is, how it works under the hood, and how to get your first token exchange running.
The Token You Have vs. the Token You Need
Most Auth0 integrations start with a standard flow: a user authenticates through Universal Login, Auth0 issues tokens, and your app uses them to call APIs. Clean and straightforward.
But not every scenario starts with Universal Login. Sometimes the user already has a valid session or token from somewhere else:
- A legacy IdP that you are migrating away from and, for example, users still hold valid refresh tokens from the old system
- An external authentication provider like a partner's OIDC service, a government identity system, or a corporate directory you cannot federate via standard SAML/OIDC
- A support tool where agents need to act on behalf of customers
In all these cases, you need to take something Auth0 does not natively understand — a "foreign" token — and exchange it for standard Auth0 tokens that your APIs trust.
Before CTE, developers resorted to workarounds: backend proxies that impersonate users via the Management API, shared secrets passed through custom headers, or manual user creation followed by direct token minting. These work, but they are fragile, hard to secure, and do not leave a proper audit trail.
CTE replaces all of that with a standards-based flow.
How It Works: The Core Model
CTE implements the RFC 8693 token exchange grant type on Auth0's /oauth/token endpoint. The flow has three actors:
- Your application: sends a request with the foreign token
- Auth0's authorization server: validates the request, enforces security, issues tokens
- Your Action: the custom code that validates the foreign token and controls the transaction outcome
Here is the flow:
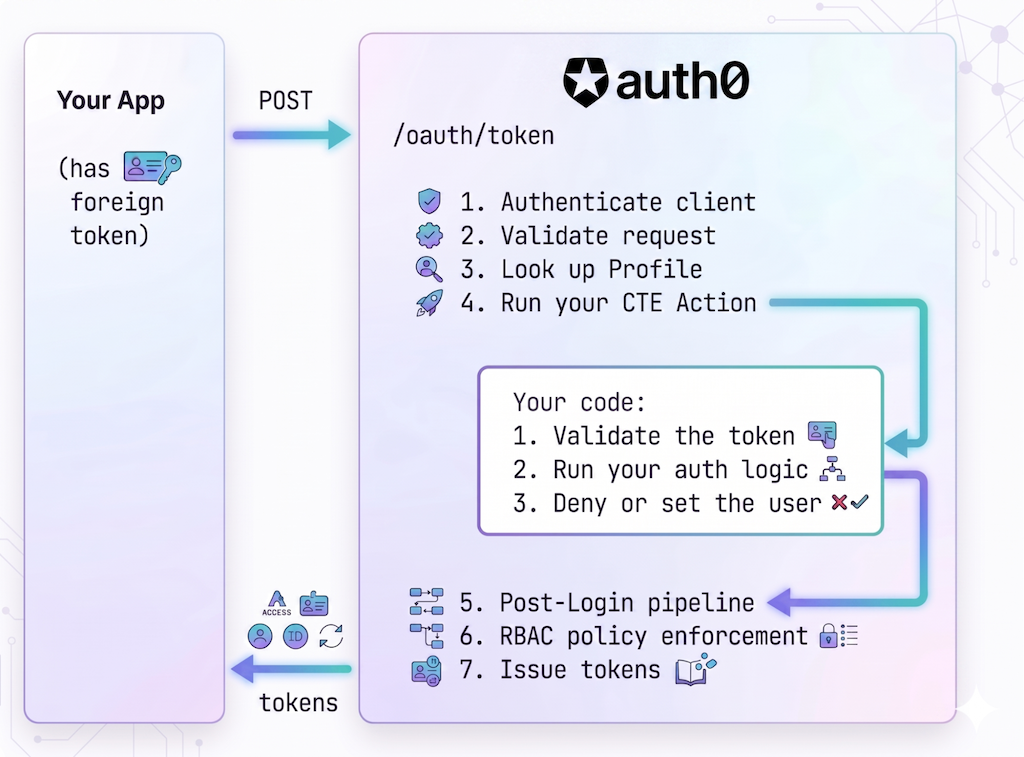
- Authenticate client
- Validate request
- Look up profile
- Run your CTE Action
- Validate the token
- Run your auth logic
- Deny or set the user
- Post-Login pipeline
- RBAC policy enforcement
- Issue tokens
Everything outside step 4 is handled by Auth0. Step 4 is yours.
Three Concepts You Need to Know
Token Exchange Profile
A Token Exchange Profile is the configuration object that ties everything together. Each profile defines:
- A
subject_token_type: a URI that identifies what kind of foreign token this profile handles (for example,https://legacy-idp.example.com/refresh-token) - An Action: the code that processes tokens of this type
When a token exchange request arrives, Auth0 looks up the profile by matching the subject_token_type in the request. If no profile matches, the request is rejected.
You can have multiple profiles on a tenant (one for your migration, another for a partner integration, another for delegated authorization, etc), each with its own subject_token_type and its own Action.
CTE Action
This is where "custom" happens. A CTE Action is an Auth0 Action bound to the custom-token-exchange trigger. It receives the raw foreign token and does three things:
- Validate the token: however you need to. Verify a JWT signature, call an external API, check a database, decode a SAML assertion. Auth0 treats the
subject_tokenas an opaque string; the interpretation is entirely up to you. - Run your authorization logic: decide whether this token exchange should be allowed. Check claims, verify permissions, validate the client or the source.
- Deny or set the user for the transaction: if validation or authorization fails, reject the request. If everything checks out, call
setUserById()orsetUserByConnection()to set the user and allow the transaction to proceed.
Setting the user is what allows the transaction, it is the signal that your code has approved the exchange. That is why it should come after your authorization logic, not before.
Two methods are available to set the user:
setUserById(userId): Use this when you already have the Auth0user_idand the user exists in Auth0. Common for scenarios where users are pre-provisioned.setUserByConnection(connection, profile, options): Use this when you have the user's identifier in the external system, which maps to a Connection in Auth0. This method can also create or update the user on the fly, making it ideal for migration scenarios. Think of it as equivalent to what happens when a user authenticates through Universal Login via a specific Connection.
Instance-Bound Actions
Unlike other Auth0 Action triggers (like Post-Login), where Actions are bound to the trigger at the tenant level and run for every transaction, CTE Actions are bound to individual profiles. Each profile maps to exactly one Action.
This means two things:
- You can have completely independent token exchange logic for different use cases, without any cross-contamination.
- A CTE Action is required for token exchange to work: if a profile does not have an Action, the transaction fails.
The Request
A CTE request is a standard OAuth 2.0 token request with the token exchange grant type:
curl --request POST \
  --url 'https://YOUR_TENANT.auth0.com/oauth/token' \
  --header 'content-type: application/x-www-form-urlencoded' \
  --data grant_type=urn:ietf:params:oauth:grant-type:token-exchange \
  --data client_id=YOUR_CLIENT_ID \
  --data client_secret=YOUR_CLIENT_SECRET \
  --data 'subject_token=eyJhbGciOiJSUzI1NiIs...' \
  --data 'subject_token_type=https://legacy-idp.example.com/refresh-token' \
  --data 'audience=https://api.example.com' \
  --data 'scope=openid profile offline_access read:orders'
A few things to note:
grant_typeis alwaysurn:ietf:params:oauth:grant-type:token-exchange. This is the RFC 8693 standard value.subject_tokenis the foreign token. It can be anything: a JWT, an opaque string, a base64-encoded SAML assertion. Your Action knows what to do with it.subject_token_typeis the URI that identifies the token type. Auth0 uses this to look up the Token Exchange Profile.audienceandscopework exactly like other Auth0 grant types. Includeoffline_accessif you need a refresh token, and any custom scopes your API defines.- Client authentication follows your application's configured method (client secret, private key JWT, etc.). Public clients are also supported.
On success, you get back the same token response you'd get from any other Auth0 grant:
{
  "access_token": "eyJhbGciOiJSUzI1NiIs...",
  "id_token": "eyJhbGciOiJSUzI1NiIs...",
  "refresh_token": "v1.Mjv...",
  "issued_token_type": "urn:ietf:params:oauth:token-type:access_token",
  "token_type": "Bearer",
  "expires_in": 86400,
  "scope": "openid profile offline_access read:orders"
}
Setting It Up
Let's walk through the setup. You'll need an Auth0 tenant with the CTE feature enabled (available in Public Early Access for production usage for Enterprise, B2B, and B2C Pro plans).
Step 1: Enable CTE on Your Application
Use the Management API to configure your application to allow token exchange:
curl --request PATCH \
  --url 'https://YOUR_TENANT.auth0.com/api/v2/clients/YOUR_CLIENT_ID' \
  --header 'authorization: Bearer MGMT_API_TOKEN' \
  --header 'content-type: application/json' \
  --data '{
    "token_exchange": {
      "allow_any_profile_of_type": ["custom_authentication"]
    }
  }'
Your application must be a first-party client and OIDC-conformant.
Step 2: Write Your Action
Go to Auth0 Dashboard > Actions > Library and create a new Action with the CTE trigger.
Here is an Action that validates a JWT from an external IdP and sets the user for the transaction:
exports.onExecuteCustomTokenExchange = async (event, api) => {
  const { subject_token } = event.transaction;

  // 1. Validate the subject token
  const { isValid, payload } = await validateToken(subject_token);

  if (!isValid) {
    // Token validation failed — signal to attack protection
    api.access.rejectInvalidSubjectToken('Invalid subject_token');
    return;
  }

  // 2. Run your authorization logic
  //    for example, check claims, verify the client is allowed, validate scopes
  const isAuthorized = await checkAuthorizationPolicy(payload, event.client);

  if (!isAuthorized) {
    // Authorization failed — deny with an OAuth error
    api.access.deny('invalid_request', 'Token exchange not authorized');
    return;
  }

  // 3. Set the user — this allows the transaction to proceed
  api.authentication.setUserByConnection(
    'my-oidc-connection',  // The Auth0 Connection for this external IdP
    {
      user_id: payload.sub,
      email: payload.email,
      email_verified: payload.email_verified,
      name: payload.name,
    },
    {
      createBehavior: 'createIfNotExists',
      updateBehavior: 'none',
    }
  );
};

async function validateToken(subjectToken) {
  // Validate the external JWT: verify signature, check expiration, etc.
  // See: https://auth0.com/docs/authenticate/custom-token-exchange/cte-example-use-cases#code-samples
}

async function checkAuthorizationPolicy(payload, client) {
  // Your business logic: is this token exchange allowed?
  return true;
}
Notice the three-step structure:
- Validate the token: if it fails, call
rejectInvalidSubjectToken(). This feeds into attack protection, tracking failed attempts by IP. - Authorize the exchange: if it fails, call
deny()with an appropriate error code. - Set the user: if only after validation and authorization pass. This is what allows the transaction.
The distinction between rejectInvalidSubjectToken() and deny() matters: rejectInvalidSubjectToken tells Auth0 the token itself was bad (triggering brute-force protection), while deny is for any other reason to reject (authorization failure, business rule, etc.).
For detailed token validation patterns including JWT signature verification, see the code samples in the Auth0 docs.
Deploy the Action when you are ready.
Step 3: Create a Token Exchange Profile
Link your Action to a subject_token_type by creating a profile via the Management API:
curl --request POST \
  --url 'https://YOUR_TENANT.auth0.com/api/v2/token-exchange-profiles' \
  --header 'authorization: Bearer MGMT_API_TOKEN' \
  --header 'content-type: application/json' \
  --data '{
    "name": "Legacy IdP Migration",
    "subject_token_type": "https://legacy-idp.example.com/refresh-token",
    "action_id": "YOUR_ACTION_ID",
    "type": "custom_authentication"
  }'
The subject_token_type is a URI you define. It must be unique across your tenant, use a domain you control (for example, https://your-company.com/migration-token), and cannot use reserved namespaces (like urn:auth0 or https://auth0.com).
Step 4: Make a Token Exchange Request
That is it. You can now exchange tokens:
curl --request POST \
  --url 'https://YOUR_TENANT.auth0.com/oauth/token' \
  --header 'content-type: application/x-www-form-urlencoded' \
  --data grant_type=urn:ietf:params:oauth:grant-type:token-exchange \
  --data client_id=YOUR_CLIENT_ID \
  --data client_secret=YOUR_CLIENT_SECRET \
  --data 'subject_token=eyJhbGciOiJSUzI1NiIs...' \
  --data 'subject_token_type=https://legacy-idp.example.com/refresh-token' \
  --data 'audience=https://api.example.com' \
  --data 'scope=openid profile offline_access read:orders'
Inside the Action: What Is Available
Your CTE Action has access to contextual information about the request and a set of API methods to control the outcome. For the full reference, see the Event Object and API Object docs. Here are the highlights:
event.transactiongives you the rawsubject_token,subject_token_type, andrequested_scopes. You also getevent.client,event.request(IP, geolocation, headers), andevent.resource_serverfor advanced validation.api.authentication.setUserById(userId)/setUserByConnection(connection, profile, options): set the user for the transaction. You must call exactly one per transaction; calling neither (or both) fails the exchange.setUserByConnectioncan also create or update users on the fly.api.authentication.setOrganization(orgId): associate the transaction with an Auth0 Organization.api.access.deny(code, reason): reject with an OAuth error.api.access.rejectInvalidSubjectToken(reason): reject and trigger attack protection tracking.
Security: You Own the Validation
This is worth emphasizing: Auth0 treats the subject_token as an opaque string. It performs no validation on it. Your Action is the validation layer.
This flexibility is powerful, it means you can accept any token format from any system, but it comes with responsibility. If your Action does not properly validate the token, an attacker could forge a subject_token and get Auth0 tokens for any user.
Attack Protection
CTE integrates with Auth0's Suspicious IP Throttling. When your Action calls api.access.rejectInvalidSubjectToken(), Auth0 tracks the failure against the requesting IP. After 10 failed attempts (configurable), the IP is blocked and gets HTTP 429 responses.
This is especially important for public clients: mobile apps and SPAs that cannot securely store a client secret. Without attack protection, an attacker could brute-force subject tokens from any IP. Always use rejectInvalidSubjectToken() (not deny()) when the failure is specifically about an invalid token.
Caching external validation data
If your validation involves fetching external data, like public keys from a JWKS endpoint or looking up tokens in an external database, use api.cache to avoid hitting external services on every request:
const cachedKeys = api.cache.get('external-jwks');
if (!cachedKeys || cachedKeys.expires_at < Date.now()) {
  const keys = await fetchJWKS('https://external-idp.example.com/.well-known/jwks.json');
  api.cache.set('external-jwks', JSON.stringify(keys), { ttl: 3600 });
}
What Happens After Your Action
Your CTE Action does not exist in isolation. After it runs successfully, Auth0 continues with the standard pipeline:
- Post-Login Actions execute: any existing logic for custom claims, role mapping, or access control still applies. This means you do not need to duplicate logic from your Post-Login Actions into your CTE Action.
- RBAC enforcement: Auth0 validates the requested audience and scopes against your API's Role-Based Access Control configuration.
- Consent: the API's "Allow Skipping User Consent" setting must be enabled.
- Token issuance: Auth0 issues access tokens, ID tokens, and (if
offline_accessis requested and allowed) refresh tokens. - Tenant logs: a success (
secte) or failure event is emitted, giving you a full audit trail.
When to Use CTE
CTE is the right tool when:
- You need to accept tokens Auth0 does not natively understand: from legacy systems, partner IdPs, or custom authentication services
- You need custom validation logic: the interpretation of the token is specific to your business
- You are migrating users from another identity system and want to avoid forcing re-authentication
- You need delegation semantics: support agents or admins acting on behalf of users (coming in a future release)
CTE might not be the right tool when:
- Auth0 already supports the external IdP natively (for example, Google, Apple, enterprise SAML/OIDC). Use social connections or enterprise connections instead.
- You need service-to-service token exchange in a microservice chain. Consider using Auth0 On-Behalf-Of instead if the incoming token was issued by the same Auth0 tenant.
Start Building Today
This post covered the foundations: what CTE is, how it works, and how to set it up. In upcoming posts in this series, we'll go deeper into specific use cases:
- Seamless user migration and external authentication: how to migrate users from a legacy IdP or integrate an external authentication provider, with full code examples and production patterns
- Impersonation with delegation semantics: how to use
actor_tokenand theactclaim to build secure support tooling with proper audit trails (coming when this feature ships)
CTE is available today in Public Early Access for Auth0 Enterprise, B2B, and B2C Pro plans. It is ready for production use. If you have tokens from external systems that need to become Auth0 tokens, this is the tool to reach for.
Get started now: