In the previous three parts of this series, you built an expense agent that knows who's asking, knows what they're allowed to see, and can act on their behalf. It authenticates the manager with Auth0 Universal Login, retrieves only the expense reports that manager is authorized to view using Auth0 Fine-Grained Authorization, and emails employees about incomplete reports using a Gmail token fetched from Auth0 Token Vault. All without the token or any raw credentials ever reaching the LLM.
That covers two of the three jobs a manager actually does when reviewing expenses. The third is approval, and it's the one our agent still can't do. Right now, once a report is complete, someone still has to open the app, read the summary, and manually decide whether to approve it.
You might wonder why the agent couldn't just ask the manager to type "approved" into the chat and call it done. It's tempting, but it doesn't hold up: the agent has no way to distinguish a deliberate approval from a casual acknowledgment. There's no cryptographic proof the manager actually made that decision, and it chains the manager to a browser tab for something a phone notification handles better. Approval is a security-sensitive action: it needs the same rigor you'd expect from any other authentication event, not a string match in a chat log.
This post closes that gap using Client-Initiated Backchannel Authentication (CIBA). The agent triggers a push notification to the manager's phone, describing exactly what it's asking them to approve. The manager taps Approve or Deny in their mobile app. The agent picks up the decision and reports it back in the chat.
How CIBA Works
Every OAuth flow you've used so far in this series starts with the user in the driver's seat: they open a browser, land on a login page, and grant permissions interactively. CIBA flips that around. A backend application, your expense agent, initiates the authentication request on the user's behalf, and the user responds out-of-band, from a device they already have enrolled, without ever touching a browser.
For this use case, the flow looks like this:
- The agent calls Auth0's
/bc-authorizeendpoint, specifying the manager as the target and attaching a binding message, i.e. a short, human-readable description of what's being approved (e.g., "Approve expense exp-001: $450 at Hotel for NYC client dinner"). - Auth0 pushes a notification to the manager's enrolled device.
- The agent polls Auth0's
/tokenendpoint in a loop, waiting for the manager to respond. - The manager taps Approve or Deny in their mobile app.
- The polling loop resolves: a token comes back on approval, an
access_deniederror comes back on rejection. - The agent executes the approval or rejection task based on the result in the previous step and reports the outcome in the chat.
The binding message is doing the real security work here. "Approve expense exp-001: $450 at Hotel for NYC client dinner" gives the manager enough context to make an informed decision from a lock screen. Without it, the notification would just say "an application wants your approval", which is exactly the kind of vague prompt that trains people to tap "yes" on things they shouldn't. Specific, unambiguous binding messages are what make CIBA safe to use for something as consequential as financial approval.
For more details about CIBA, read the following content:
Building the Expense API
Before wiring up CIBA on the agent side, you need to implement the missing piece: an ASP.NET Core minimal API project that acts as the system of record for expense decisions, protected with Auth0.
If you have the Auth0 Templates for .NET package installed on your machine, you can add the new project to the solution by running the following commands:
dotnet new auth0webapi -o ExpenseApi
dotnet sln add ExpenseApi/ExpenseApi.csproj
The first command also registers your API with Auth0 if you have the Auth0 CLI installed and logged in.
Take a look at this document to learn more about the Auth0 Templates for .NET.
ExpenseApi is deliberately tiny: a couple of minimal API endpoints backed by an in-memory dictionary, not a production data layer. That keeps the focus on what matters here: how the token CIBA issues gets validated and used to authorize one specific action.
Update ExpenseApi/Program.cs with the code highlighted below:
// ExpenseApi/Program.cs

//...existing code...

//👇 new code
builder.Services.AddAuthorizationBuilder()
    .AddPolicy("approve:expenses", policy =>
        policy.RequireClaim("scope", "approve:expenses"));
//👆 new code

var app = builder.Build();

//...existing code...

//👇 new code
var statuses = new Dictionary<string, ExpenseStatusUpdate>();

app.MapPost("/expense/{id}/status", (string id, ExpenseStatusUpdate update) =>
{
    statuses[id] = update;
    return Results.NoContent();
})
.RequireAuthorization("approve:expenses");

app.MapGet("/expense/{id}/status", (string id) =>
    statuses.TryGetValue(id, out var update) ? Results.Ok(update) : Results.NotFound());
//👆 new code

app.Run();

//...existing code...

//👇 new code
record ExpenseStatusUpdate(string Status, DateTimeOffset Timestamp, string ManagerId);
The approve:expenses policy makes sure a validly-scoped token carries the specific permission this endpoint requires. A token that only proves "this is a logged-in manager" isn't enough; it has to prove "this manager was specifically authorized, through CIBA, to approve this expense."
The GET endpoint isn't used by the agent at all. It's there so you can verify, later in this post, that the token round-trip actually reached the API and not just the chat window.
Configuring Auth0 for CIBA
Before any code changes to your agent, CIBA needs a few one-time settings in your Auth0 tenant.
Confirm your app is a confidential client
Your expense agent has been a Regular Web Application since part 1, which makes it a confidential client, i.e., it holds a client secret. That's a hard requirement for CIBA: the grant type isn't available to SPAs or native apps, since they can't keep a secret safe. If you followed the series from the start, there's nothing to change here.
Note that CIBA is available in Enterprise Plan or as an add-on. Look at Auth0 Pricing for details.
However, for testing purposes, you can create a new Auth0 tenant and will have CIBA available for a limited period of time.
Register the Expense API and its scope
If you used the autoregistration feature of the Auth0 Templates for .NET, your Expense API is already registered with Auth0. This means that the first two steps of the following list have been executed, but you need to add permission support:
- In your Auth0 dashboard, go to Applications > APIs> Create API. No need to do this step if you autoregistered the API.
- Set the name to
ExpenseApiand the identifier tohttps://expenseapi.com. This becomes theAudienceyour agent requests and the valueExpenseApiAPI checks against. No need for this step if you autoregistered the API. - Under the new API's Permissions tab, add a permission named
approve:expenseswith a description like "Approve expense reports.", as shown below:
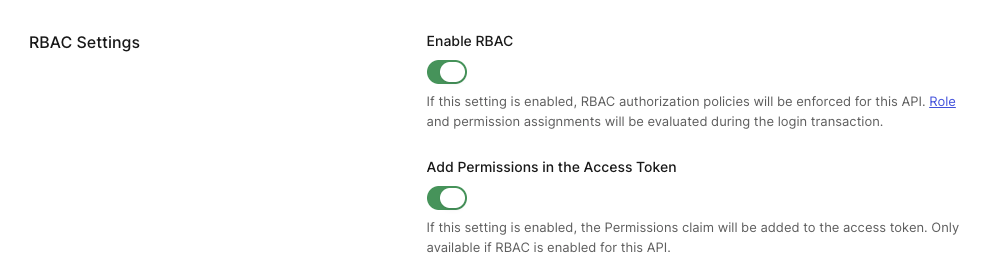
- In the API's Settings tab, toggle Enable RBAC and Add Permissions in the Access Token on:
- Save the changes.
Enable CIBA on the application
To enable your agent to use CIBA, navigate to your Auth0 dashboard and follow these steps:
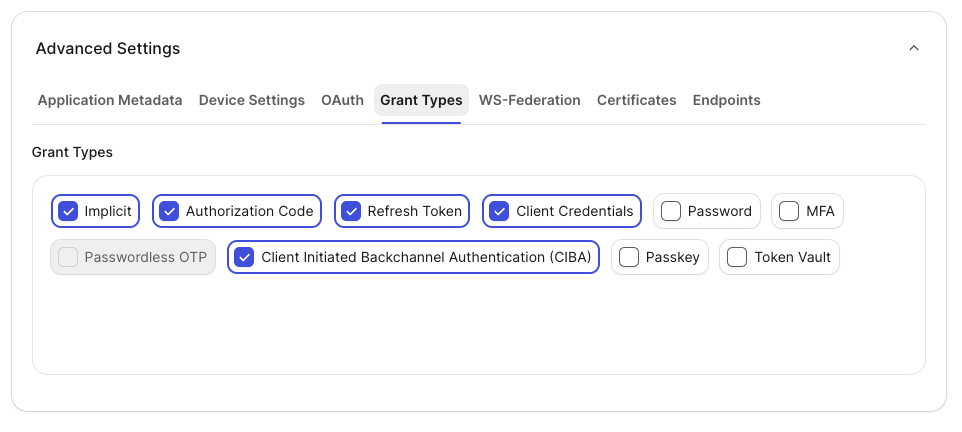
- Go to Applications > Expense Agent > Settings > Advanced Settings > Grant Types.
- Enable CIBA as shown in the following picture:
- Save.
Authorize the agent to access the API
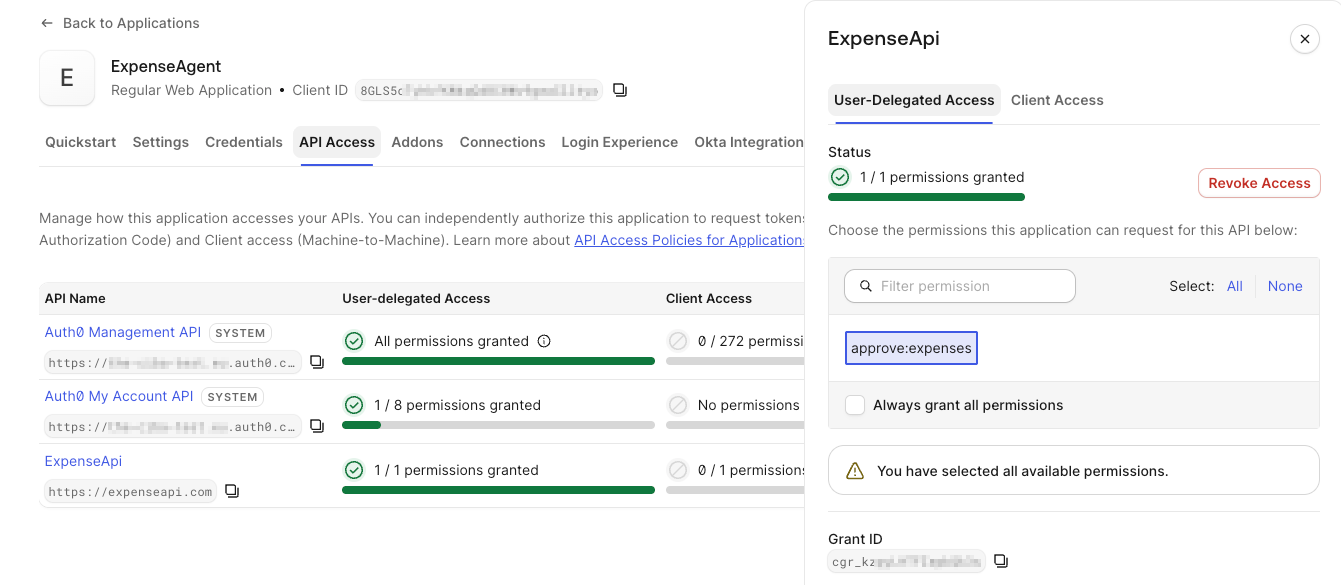
While in the ExpenseAgent configuration page, click the API Access tab, locate the ExpenseAPI API, and click the Edit button on the right. Grant the approve:expenses permission when the agent acts on the user behalf, as shown in the following screenshot:
Enable Guardian push notifications
To manage push notifications, we will use the Auth0 Guardian app, but you can embed Auth0 Guardian capabilities in your own custom app using the Guardian SDK. Follow these steps to enable push notifications on your Auth0 tenant:
- Go to Security > Multi-factor Auth.
- Enable Push Notifications as shown below:

Enroll the manager's device
The manager needs the Auth0 Guardian app installed on their device and enrolled with your tenant.
In the Security > Multi-factor Auth section of the Auth0 dashboard, set Always as the MFA authentication policy.
The first time a user signs up or logs in to your application, the Auth0 Universal Login provides a QR code they can use to register the Auth0 Guardian app or custom Guardian SDK app as a secondary authentication factor. This enables the user's device to receive CIBA notifications as well.
For testing, enroll your own device as the test manager: you'll need it in a few minutes to approve your first request.
Read the documentation for a comprehensive guide to configuring CIBA for your application.
Adding the CIBA Package
The .NET SDK for talking to Auth0's authentication endpoints lives in its own package. Go to the ExpenseAgent folder of your project and add it to the project with the following command:
dotnet add package Auth0.AuthenticationApi
The Auth0.AuthenticationApi package gives you an AuthenticationApiClient class with methods for both halves of the CIBA flow: starting the request and polling for the result. So you won't be hand-rolling HTTP calls to /bc-authorize and /token.
Adding the Approval Service
With the Expense API in place and CIBA enabled on the tenant, you can now build the piece that ties them together. You will create a dedicated ManagerApprovalService using the same pattern FgaService and ExpenseReportService followed in earlier parts. It owns the CIBA request, the polling loop, and the follow-up call to ExpenseApi.
Go to the ExpenseAgent/Services folder and add the ManagerApprovalService.cs file with the following code:
// ExpenseAgent/Services/ManagerApprovalService.cs

using System.Net.Http.Headers;
using Auth0.AuthenticationApi;
using Auth0.AuthenticationApi.Models.Ciba;
using Auth0.Core.Exceptions;

namespace ExpenseAgent.Services;

public class ManagerApprovalService
{
    private readonly AuthenticationApiClient _authApiClient;
    private readonly HttpClient _expenseApiClient;
    private readonly string _clientId;
    private readonly string _clientSecret;
    private readonly string _issuer;
    private readonly string _audience;

    public ManagerApprovalService(IConfiguration config, HttpClient expenseApiClient)
    {
        _issuer = $"https://{config["Auth0:Domain"]}/";
        _authApiClient = new AuthenticationApiClient(new Uri(_issuer));
        _expenseApiClient = expenseApiClient;
        _clientId = config["Auth0:ClientId"]!;
        _clientSecret = config["Auth0:ClientSecret"]!;
        _audience = config["ManagerApproval:Audience"]!;
    }

    public async Task<string> RequestApprovalAsync(string managerId, string expenseId, string summary)
    {
        // Trigger the CIBA request and send a push notification to the manager's device,
        // scoped to the Expense API with the approve:expenses permission
        var cibaResponse = await _authApiClient.ClientInitiatedBackchannelAuthorization(
            new ClientInitiatedBackchannelAuthorizationRequest
            {
                ClientId = _clientId,
                ClientSecret = _clientSecret,
                Audience = _audience,
                Scope = "openid approve:expenses",
                BindingMessage = SanitizeMessage($"Expense {expenseId}: {summary}"),
                LoginHint = new LoginHint
                {
                    Format = "iss_sub",
                    Issuer = _issuer,
                    Subject = managerId
                }
            });

        // Poll until the manager acts or the request expires
        while (true)
        {
            await Task.Delay(TimeSpan.FromSeconds(5));

            try
            {
                var tokenResponse = await _authApiClient.GetTokenAsync(
                    new ClientInitiatedBackchannelAuthorizationTokenRequest
                    {
                        AuthRequestId = cibaResponse.AuthRequestId,
                        ClientId = _clientId,
                        ClientSecret = _clientSecret
                    });

                // A successful token response means the manager approved. Record it on the Expense API,
                // using the CIBA-issued access token (scoped to approve:expenses) as the bearer credential
                using var request = new HttpRequestMessage(HttpMethod.Post, $"/expense/{expenseId}/status")
                {
                    Content = JsonContent.Create(new
                    {
                        Status = "Approved",
                        Timestamp = DateTimeOffset.UtcNow,
                        ManagerId = managerId
                    })
                };
                request.Headers.Authorization = new AuthenticationHeaderValue("Bearer", tokenResponse.AccessToken);

                await _expenseApiClient.SendAsync(request);

                return $"Expense {expenseId} approved by the manager.";
            }
            catch (ErrorApiException ex)
            {
                switch (ex.ApiError.Error)
                {
                    case "authorization_pending":
                        continue; // manager hasn't tapped yet. Keep waiting

                    case "access_denied":
                        return $"Expense {expenseId} rejected by the manager.";

                    case "expired_token":
                        return $"Approval request for expense {expenseId} timed out. No response was received.";

                    default:
                        throw;
                }
            }
        }
    }

   private string SanitizeMessage(string input)
    {
        if (string.IsNullOrEmpty(input))
            return input;

        // Replace unadmitted characters with space
        var sanitized = System.Text.RegularExpressions.Regex.Replace(input, @"[^a-zA-Z0-9+-_.,:# ]", " ");

        // Truncate to 64 characters
        return sanitized.Length > 64 ? sanitized[..64] : sanitized;
    }
}
Three things are worth highlighting in this code:
- The CIBA request sets the audience and the scopes, which include
approve:expenses. That's what makes Auth0 mint a token the Expense API will actually accept, carrying the specific permission its authorization policy checks for. - The
BindingMessage, i.e., the message that will show in the push notification, has some limitations. This is why its value is processed by theSanitizeMessage()function. - Once
GetTokenAsync()returns successfully, the service immediately builds aPOSTrequest against/expense/{expenseId}/status, attachestokenResponse.AccessTokenas the bearer credential, and sends it. This turns "the manager tapped Approve" into a durable record on a separate, protected service, rather than just a string returned to the chat.
Rejection stays exactly as simple as it was before: on access_denied, the method returns immediately. To keep things focused, there's no corresponding "rejected" endpoint on the Expense API, but you can add the rejection flow as an exercise. Drop a message below if you need help.
Register ManagerApprovalService in Program.cs, right next to where FgaService and ExpenseReportService are registered:
// ExpenseAgent/Program.cs

//...existing code...
builder.Services.AddSingleton<ExpenseReportService>();
builder.Services.AddSingleton<FgaService>();

//👇 new code
builder.Services.AddHttpClient<ManagerApprovalService>(client =>
{
    client.BaseAddress = new Uri(builder.Configuration["ManagerApproval:ApiBaseUrl"]!);
});
//👆 new code

//...existing code...
AddHttpClient<ManagerApprovalService> registers ManagerApprovalService and gives it a properly pooled HttpClient pointed at ExpenseApi. So the whole service, tokens and all, comes out of dependency injection as one unit.
The only missing part at this point is the additional setting keys in appsettings.json mentioned in the previous code snippets. Add the section shown below:
// ExpenseAgent/appsettings.json

{
  //...existing settings...

  "ManagerApproval": {
    "Audience": "https://expenseapi.com",
    "ApiBaseUrl": "https://localhost:7015"
  }
}
Replace the values of these keys according to your actual environment.
If you followed the suggestions in this article, you have registered the Expense API with the https://expenseapi.com audience. Also, the Expense API runs on https://localhost:7015 on my local machine.
Updating the Agent Tools
With ManagerApprovalService registered, you can add it to the tools available to the agent. Update Agent/ExpenseAgentTools.cs as highlighted here:
// ExpenseAgent/Agent/ExpenseAgentTools.cs

//...existing code...
using ExpenseAgent.Services;

namespace ExpenseAgent.Agent;

public class ExpenseAgentTools
{
    //...existing code...

    //👇 new code
    private readonly ManagerApprovalService _approvalService;
    //👆 new code

    public ExpenseAgentTools(
        string managerId,
        ExpenseReportService expenseService,
        FgaService fgaService,
        HttpClient httpClient,
        string? cookie,
        ManagerApprovalService approvalService) //👈 new code
    {
        _managerId = managerId;
        _expenseService = expenseService;
        _fgaService = fgaService;
        _httpClient = httpClient;
        _cookie = cookie;
        _approvalService = approvalService; //👈 new code
    }

    //...existing code...

    //👇 new tool
    [Description("Send a push notification to the manager requesting approval or rejection of a complete expense report. Use only when the report has all required fields: amount, merchant, and justification.")]
    public Task<string> RequestManagerApproval(
        [Description("The expense report ID")] string expenseId,
        [Description("A brief one-line summary: amount, merchant, and justification (e.g. '$450 at Hotel for NYC client dinner')")] string summary)
    {
        return _approvalService.RequestApprovalAsync(_managerId, expenseId, summary);
    }
    //👆 new tool
}
You add all the elements to inject ManagerApprovalService and add the RequestManagerApproval() tool, which simply calls the RequestApprovalAsync() method.
Updating the System Prompt
With the tool in place, the agent needs to know when to use it. Update the system prompt in Agent/ExpenseAgentService.cs so the evaluation logic covers the full loop: check for completeness, then either request missing data or request approval:
// ExpenseAgent/Agent/ExpenseAgentService.cs

//...existing code...

var systemPrompt = """

    // existing text...

    If all required fields are present:
    - Call RequestManagerApproval with the expense ID and a brief one-line summary.
    - The manager will receive a push notification on their phone.
    - Wait for the result and tell the manager the outcome.

    Be concise and professional. Address the manager by name when you know it.
    Process one report at a time. Do not trigger multiple approval requests simultaneously.
    """;

//...existing code...
That last instruction prevents the agent from kicking off several CIBA polling loops at once, which would block the Blazor component and leave the manager staring at a spinner while multiple push notifications pile up on their phone. A production system would hand approval tracking off to a background job instead of polling synchronously inside the tool call. For a tutorial, though, synchronous polling keeps the flow easy to follow, and it's a pattern you'll see revisited in the "Going Further" section below.
Updating the Chat Component
The last piece of wiring is getting ManagerApprovalService into ExpenseAgentTools. Update Components/Pages/Chat.razor as shown in the following code block:
@* ExpenseAgent/Components/Pages/Chat.razor *@

@* ...existing code... *@
@inject ManagerApprovalService ApprovalService

<PageTitle>Expense Agent</PageTitle>

@* ...existing markup... *@

@code {
    //...existing code...

    private async Task SendMessage()
    {
        //...existing code...
        try
        {
            var tools = new ExpenseAgentTools(
                _userId,
                ExpenseService,
                FgaService,
                _apiClient,
                _cookie,
                ApprovalService); //👈 new code

            var reply = await AgentService.ChatAsync(_userId, text, _userName, tools);
            _messages.Add(("Agent", reply));
        }
        finally
        {
            _thinking = false;
        }
    }
    //...existing code...
}
ExpenseAgentTools picked ApprovalService as its sixth constructor argument, but the component itself doesn't need to know anything about CIBA, tokens, or the Expense API. It just passes along a service already built for it.
Testing the Approval Flow
Now you are ready to test your agent with the full approval flow. Before jumping into the actual test, perform the following checks to ensure everything is ready:
- Make sure
exp-001(Alice's $450 Hotel dinner, complete with all fields) is correctly initialized. - Make sure the FGA tuple
user:auth0|manager1 can_read expense:exp-001exists from part 2. - Start
ExpenseApialongside the agent (dotnet run --project ExpenseApi) so it's available to the agent after the CIBA flow succeeds. - Make sure the user
manager1has assigned theapprove:expensespermission (see this document to learn how to assign permissions to users). - Make sure you have Auth0 Guardian installed on your mobile device.
At this point, log in as manager1. You will be asked to enroll your device for MFA.
Once you have logged in, ask the agent:
"Review all my pending expense reports and take action on each one."
The agent retrieves the reports. For exp-002 and exp-003, which are missing fields, it sends emails exactly as it did in part 3. For exp-001, which is complete, it calls RequestManagerApproval instead.
Your phone should buzz. Open the Auth0 Guardian app and you'll see a notification along these lines:
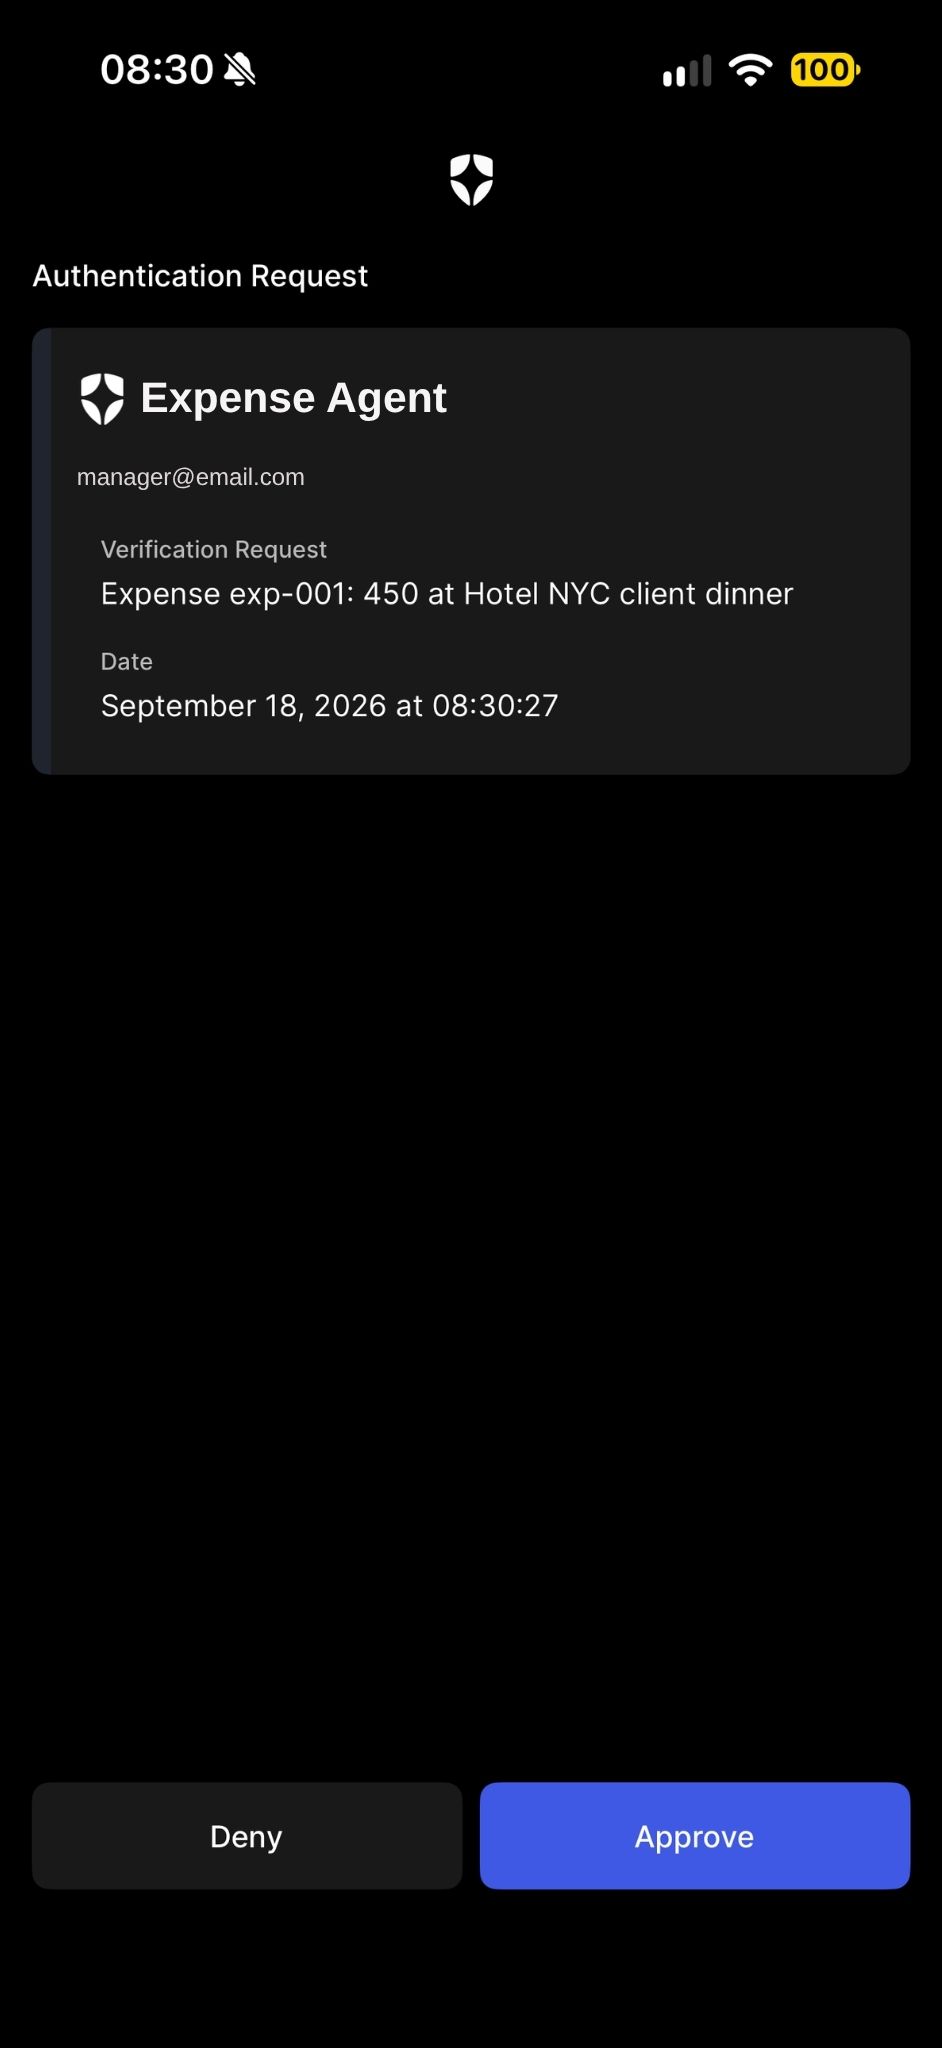
Tap Approve.
The polling loop inside ManagerApprovalService picks up the successful token response on its next iteration, immediately posts the decision to ExpenseApi, and the agent responds in the chat:
"Expense exp-001 has been approved by the manager."
Don't just trust the chat message. Confirm the token round-trip actually worked. Hit the Expense API's GET endpoint directly:
curl -k https://localhost:7015/expense/exp-001/status
You should see the recorded decision come back:
{
  "status": "Approved",
  "timestamp": "2026-01-15T18:42:03Z",
  "managerId": "auth0|manager1"
}
That confirms the access token Auth0 issued through the CIBA flow was accepted by a completely separate service, with the approve:expenses scope check passing. The approval is now a fact recorded outside the chat, not just something the LLM said happened.
Now try the alternate workflow: consider a complete report again, trigger the approval process, and this time tap Deny in Guardian. The agent should respond with something like "Expense [id] rejected by the manager." As expected, a GET against that expense's status endpoint returns 404: the current implementation does not involve the Expense API at all.
What Happened Under the Hood
This diagram describes the expense management flow implemented so far:
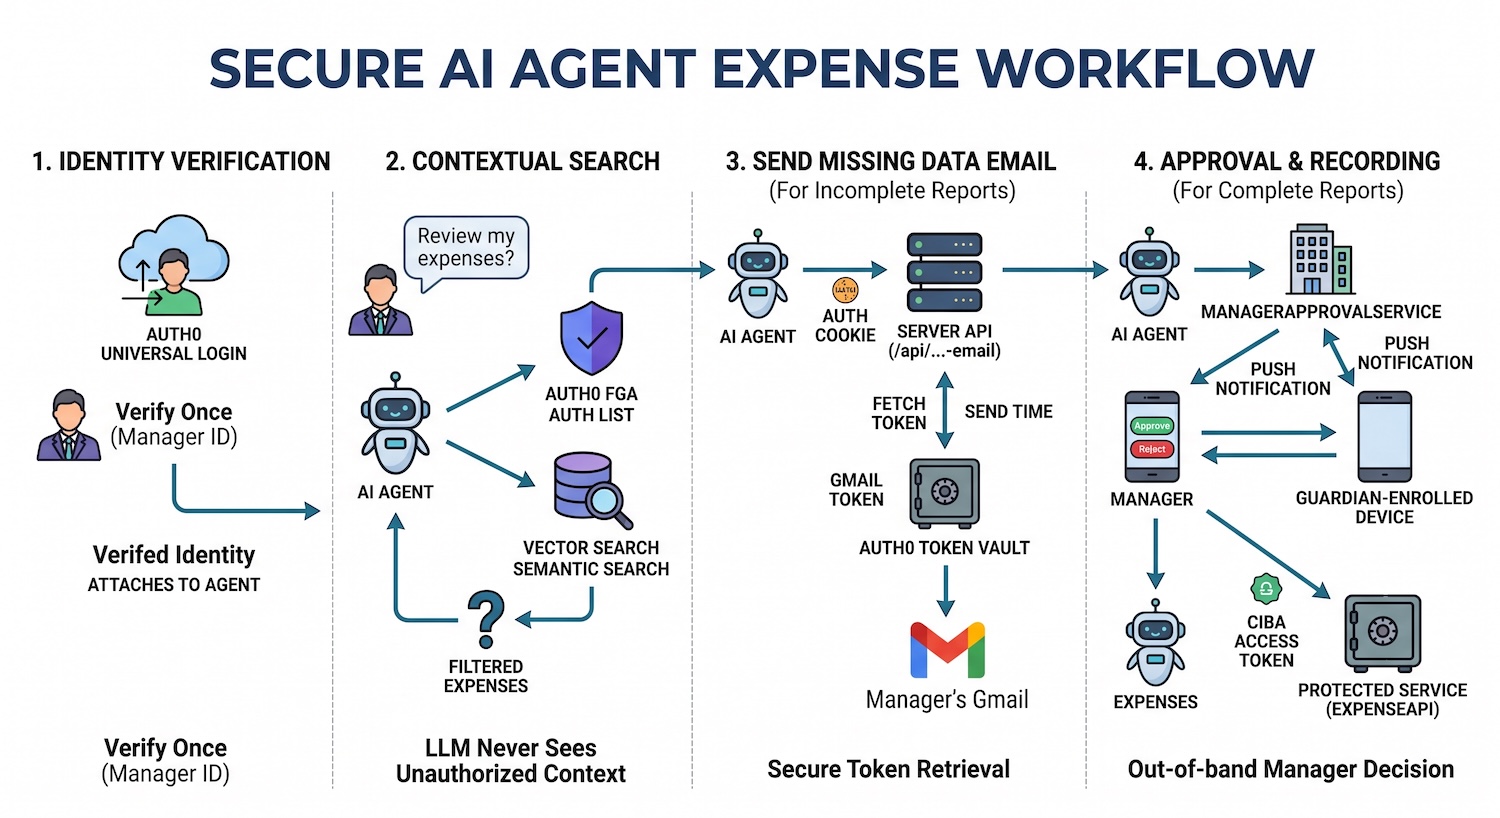
Here's the full application flow, end to end, tying together all four parts of this series:
The manager logs in via Auth0 Universal Login, set up in part 1 using the Auth0 .NET template. Their identity is verified once, and it's attached to every subsequent action the agent takes on their behalf.
The manager asks the agent to review expenses. The agent calls
GetExpenseReports(), which queries Auth0 FGA for the list of expense IDs this specific manager is authorized to see, then runs a semantic vector search filtered down to only those IDs. The LLM never receives context the manager isn't permitted to see.For incomplete reports, the agent calls
SendMissingDataEmail(), which posts to/api/send-missing-data-emailon your own server, forwarding the manager's auth cookie along with it. That endpoint fetches a Gmail token from Auth0 Token Vault right there, at send time, uses it to send an email from the manager's own Gmail account, and lets it go. The token never reaches the Blazor circuit, let alone the LLM.For complete reports, the agent calls
RequestManagerApproval(), which delegates toManagerApprovalService. Auth0 sends a push notification to the manager's Guardian-enrolled device, scoped with theapprove:expensespermission against the Expense API. The agent waits. The manager approves or rejects from their phone, without ever opening a browser. On approval, the service uses the CIBA-issued access token to record the decision onExpenseApibefore the agent reports the outcome in the chat.
Each Auth0 capability in this series solved a distinct problem along the way:
| Problem | Solution |
|---|---|
| Who is this manager? | Auth0 Universal Login (via Auth0 .NET template) |
| Which reports can they see? | Auth0 Fine-Grained Authorization |
| How does the agent act as the manager? | Auth0 Token Vault |
| How does the manager approve without leaving their phone, in a way another service can trust? | CIBA, scoped to the Expense API |
Where This Leaves Us
The expense agent you've built across this series now:
- Authenticates managers via Auth0 and knows exactly who it's talking to.
- Retrieves only the expense reports a given manager is authorized to review, enforced by Auth0 FGA.
- Emails employees on the manager's behalf when a report is missing required fields, using a Gmail token from Auth0 Token Vault that never touches the LLM.
- Routes complete reports to the manager for a real, out-of-band approval decision via CIBA and Guardian, and records that decision on a separate, protected Expense API.
That's the full loop: identity, authorization, action, and now approval.
Going Further
This series covered the essentials, but a few directions are worth exploring if you take this further:
Asynchronous approval: The CIBA polling loop in this post blocks the Blazor component until the manager responds. For production, you should consider implementing it asynchronously, unblocking the agent UI and getting back the answer when the manager approves the expense.
Audit logging: Every agent action (reports retrieved, emails sent, approvals requested) should be written to an audit log. Auth0 already logs the authentication events (login, MFA challenge, CIBA approval); your application should log the business events around them.
Multi-agent workflows: Microsoft Agent Framework supports graph-based workflows that connect multiple agents. You could split the expense evaluation agent from the approval coordination agent, running them in parallel when processing a large batch of reports.
Persistent vector store: The InMemoryVectorStore used in part 2 resets on every restart. Swap it for a persistent provider, such as Azure AI Search, PostgreSQL with pgvector, or any other VectorStoreCollection<TKey,TRecord> implementation. You can do this without changing the ExpenseReportService interface or the MAF tool that depends on it.
For any problem or questions, leave a message below.
About the author

Andrea Chiarelli
Principal Developer Advocate
I have over 20 years of experience as a software engineer and technical author. Throughout my career, I've used several programming languages and technologies for the projects I was involved in, ranging from C# to JavaScript, ASP.NET to Node.js, Angular to React, SOAP to REST APIs, etc.
In the last few years, I've been focusing on simplifying the developer experience with Identity and related topics, especially in the .NET ecosystem.